Latest Posts

SMTP Relay options in Office 365

No comments:

In Office 365, you can use SMTP submission, direct send, or SMTP relay to allow a multifunction device, printer, or application to send email using Office 365 and Exchange Online.
This could be a necessary to use in many cases, for example, you have a multi-functional printer, scanner, LOB Application like SAP, ERP, HR Management System or literally any line of business application which needs to send email notifications out to your recipients - inside or outside of your domains.
There are three main methods of sending an email, and 4th one which includes setting up IIS server which can be configured to use any of the three options. Here is what they are and what are the limits for each of the method.
  1. Client Submission method
  2. Direct Send
  3. Office 365 SMTP Relay
  4. Indirect Client Submission Method (IIS based Relay)
Method
What it means
Prerequisite
Features
Limitation
Authenticate your device or application directly with an Office 365 mailbox.

The device or application uses an email account to send email to recipients just like an email client. IMPORTANT: Use one service account for not more than 3 applications/devices in SMTP Client Submission Method.
  • Sender must have a licensed mailbox in O365.
  • SMTP and TLS capabilities for the application.
  • Port 587 (or 25 on alternate configuration) unlocked on network.


  • Send email anywhere – inside or outside of the organization.
  • Bypass most spam checks for ‘your’ users.
  • Send from any location or IP.
  • Send from third-party cloud hosting service, like Microsoft Azure
    • Device or application server must support TLS
    • 30 messages sent per minute throttle.
    • 10,000 recipients per day limit.
    Send mail directly from your printer or application.
    • Port 25 must be unlocked.
    • Static IP is recommended
    • SPF record should be configured for domain


  • No user credential to be configured.
  • No TLS support required for device.
  • Senders are not bound by the 30 messages per minute or 10,000 recipients per day limit.
    • No mail delivery to external recipients.
    Send email by relaying them through SMTP relay. Office 365 authenticates the emails you submit by originating IP address you configure when creating a connector for the purpose.
    • Port 25 must be unlocked.
    • Office 365 Connector
    • Static IP or IP range is necessary (when not using certificate).
    • SPF record should be configured for domain
    • No user credential to be configured.
    • Can be used to send email to anybody, in
    • Mail transfer will disturb if IP gets black-listed in spam list.
    • Reasonable Sending limits are imposed.
    When you need client submission but it not supported by device
    • Same as Client submission, AND
    • IIS Server to host SMTP relay service
    • Can be used in almost all scenarios


  • Same as client submission method.
  • SMTP Client Submission Method (Recommended)

    In this scenario, the device or application uses an email account to send email to recipients just like an email client. Configure your device or application to authenticate with an Office 365 mailbox, and use SMTP client submission.

    IMPORTANT: Use one service account for not more than 3 applications/devices in SMTP Client Submission Method.
    If your device or application can authenticate and send email using an Office 365 mailbox account, this is the recommended method.
    Shows how a multifunction printer connects to Office 365 using SMTP client submission. The connection endpoint is smtp.office365.com on port 587, and the printer uses Office 365 mailbox credentials to send email to internal and external recipients.
    Each device or application can have its own sender address, or all devices can use one address, such as printer@contoso.com. If you want to send email from a third-party hosted application or service, you must use SMTP client submission. In this scenario, the device or application connects directly to Office 365 using the SMTP client submission endpoint smtp.office365.com.

    Prerequisites of Client Submission method

    • Sender must have a licensed mailbox in O365.
    • SMTP and TLS capabilities for the application.
    • Port 587 (or 25 on alternate configuration) unlocked on network.

    Limits for Client Submission method

    • Device or application server must support TLS
    • 30 messages sent per minute throttle.
    • 10,000 recipients per day limit


    How to configure SMTP client submission

    Devices and applications vary in functionality and terminology use. However, these configuration settings will help you set up SMTP client submission.
    • Authentication: You must be able to configure a user name and password to send email on the device.
    • Mailbox: You must have a licensed Office 365 mailbox to send email from.
    • Transport Layer Security (TLS): Your device must be able to use TLS version 1.0 and above.
    • Port: Port 587 (recommended) or port 25 is required and must be unblocked on your network.

    Enter the settings directly on the device or in the application as the device guide or manual instructs.


    Device or Application setting
    Value
    Server/smart host
    smtp.office365.com
    Port
    Port 587 (recommended) or port 25
    TLS/ StartTLS
    Enabled
    Username/email address and password
    Login credentials of hosted mailbox being used


    Direct Send

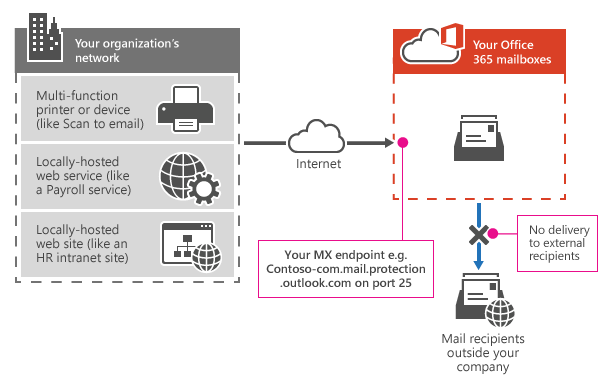
    If the device or application is only sending email to your own Office 365 users and SMTP client submission is not an option, this is the simplest method. There is no Office 365 configuration needed. However, in this case, Office 365 does not relay messages for external recipients and will only deliver to your hosted mailboxes. If your device sends an email to Office 365 that is for a recipient outside your organization, the email will be rejected.
    In the following diagram, the application or device in your organization’s network uses direct send and your Office 365 mail exchange (MX) endpoint to email recipients in your organization. It's easy to find your MX endpoint in Office 365 if you need to look it up.
    Shows how a multifunction printer uses your Office 365 MX endpoint to send email directly to recipients in your organization only.

    Prerequisites for Direct Send

    • Port: Port 25 is required and must be unblocked on your network.
    • Static IP address is recommended: A static IP address is recommended so that an SPF record can be created for your domain. This helps avoid your messages being flagged as spam.


    Limits of Direct Send

    • Direct send cannot be used to deliver email to external recipients, for example, recipients with Yahoo or Gmail addresses.
    • Your messages will be subject to antispam checks.
    • Sent mail might be disrupted if your IP addresses are blocked by a spam list.
    • Office 365 uses throttling policies to protect the performance of the service.


    How to configure Direct Send

    Simply, configure the device to send email to the MX record for one of your domains on port 25. The emails send to office 365 hosted mailboxes of your organization will be delivered. Any email send to an outsider will be rejected.


    Office 365 SMTP Relay

    Office 365 SMTP relay is very similar to direct send except that it can send mail to external recipients. 
    You configure a connector so your device or application can send email to Office 365. Office 365 can then relay email to your organization mailboxes and to external recipients.
    In the following diagram, the application or device in your organization’s network uses a connector for SMTP relay to email recipients in your organization.
    Shows how a multifunction printer connects to Office 365 using SMTP relay. The printer uses your MX endpoint and requires a connector to authenticate using your IP address. The printer can send email to internal and external recipients.
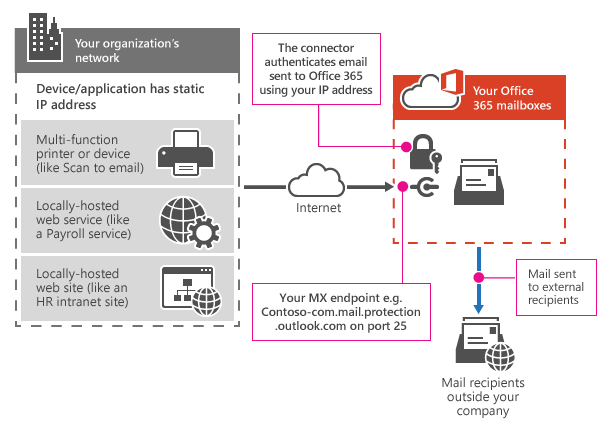
    Important: The Office 365 connector that you configure authenticates your device or application with Office 365 using an IP address. Your device or application can send email using any address (including ones that can't receive mail), as long as the address uses one of your Office 365 domains. The email address doesn’t need to be associated with an actual mailbox. For example, if your domain is contoso.com, you could send from an address like do_not_reply@contoso.com.


    Requirements for Office 365 SMTP relay

    • Static IP address or address range: Most devices or applications are unable to use a certificate for authentication. To authenticate your device or application, use one or more static IP addresses that are not shared with another organization.
    • Connector: You must set up a connector in Exchange Online for email sent from your device or application.
    • Port: Port 25 is required and must not be blocked on your network or by your ISP.
    • Licensing: SMTP relay doesn’t use a specific Office 365 mailbox to send email. This is why it’s important that only licensed users send email from devices or applications configured for SMTP relay. If you have senders using devices or LOB applications who don’t have an Office 365 mailbox license, obtain and assign an Exchange Online Protection license to each unlicensed sender. This is the least expensive license that allows you to send email via Office 365.


    Limitations of Office 365 SMTP Relay

    • Sent mail can be disrupted if your IP addresses are blocked by a spam list.
    • Reasonable limits are imposed for sending. For more information, see Higher Risk Delivery Pool for Outbound Messages.
    • Requires static unshared IP addresses (unless a certificate is used).


    How to Configure SMTP Relay

    This method allows Office 365 to relay emails on your behalf by authenticating using your public IP address (or a certificate). This requires a connector to be set up for your Office 365 account. 
    Device or application setting
    Value
    Server/smart host
    Your MX endpoint, e.g. yourcontosodomain-com.mail.protection.outlook.com
    Port
    Port 25
    TLS/StartTLS
    Enabled
    Email address
    Any email address for one of your Office 365 verified domains. This email address does not need a mailbox.


    We recommend adding an SPF record to avoid having messages flagged as spam. If you are sending from a static IP address, add it to your SPF record in your domain registrar’s DNS settings as follows:
    DNS entry
    Value
    SPF
    v=spf1 ip4: include:spf.protection.outlook.com ~all


    Indirect Client Submission Method

    If it is essential to use SMTP client submission and your printer only supports SSL 3.0, you can set up an alternative configuration called Indirect SMTP client submission. This uses a local SMTP relay server to connect to Office 365. This is a much more complex setup.

    More info about any or all of these relay options can be found here:  https://technet.microsoft.com/en-us/library/dn554323(v=exchg.150).aspx#configconnector
    Read More

    Prevent users from Autoforwarding Emails in Office 365 - Exchange Online

    No comments:


    Data Security in the cloud (okay, not just in cloud) is of utmost importance to any sort of business out there, irrespective of its nature or size. One common mean of company information leakage used by its own employees is automatic email forwarding to their personal email addresses.

    If you as an administrator, are concerned that your users might be forwarding business critical  information they receive in emails to their personal emails, you can STOP them. In Exchange Online, you can disable the features so that no user can start automatic forward of emails.

    It requires you to use PowerShell because Office 365 does not has the options to set it from Admin Dashboard (Portal).IF this is the first time you are using powershell, go configure your computer to make it work.

    You can run this powershell command set from your own computer. To run this powershell, the computer must have (one time download):

    2.       Windows Azure Active Directory Module for Windows PowerShell (64-bit version). | find 32 bit version if your pc is x86 (or 32 bit) based


    After downloading the required tools mentioned above, you should be able to create a remote powershell session with Exchange Online: 

    https://technet.microsoft.com/en-us/library/jj984289(v=exchg.160).aspx

    Finally, here is what you need to run on the console to create the NoForwarding policy. Copy below commands and run across. 

    Enable-OrganizationCustomization
    
    New-ManagementRole -Parent MyBaseOptions -Name NoForwarding
    
    Set-ManagementRoleEntry NoForwarding\Set-Mailbox -Parameters DeliverToMailboxAndForward,ForwardingAddress,ForwardingSmtpAddress -RemoveParameter
    
    New-RoleAssignmentPolicy -Name DenyForwardingRoleAssignmentPolicy -Roles NoForwarding,MyContactInformation,MyRetentionPolicies,MyMailSubscriptions,MyTextMessaging,MyVoiceMail,MyDistributionGroupMembership,MyDistributionGroups, MyProfileInformation
    
    
    At this time, your new policy is created and ready to be applied to users. To set this new Policy on Multiple Mailboxes (listed in the disableForwardingMembers.csv file), run:


    Import-CSV "D:\DisableForwardingMembers.csv" | foreach{Set-Mailbox –Identity $_.Alias -RoleAssignmentPolicy DenyForwardingRoleAssignmentPolicy}
    
    
    Bingo, now your users would not see the very option to set the automatic forwarding. Great nah?
    
    
    Read More

    Minimal Machine Requirements for Office 365. Make Outlook 2007 and 2010 work with Office 365.

    No comments:

    Even though Office 365 has come a really long way from its beginning, I continue to meet customers who want to keep using their old versions of Office suites or Windows OS Machines. I continue to educate them how Office 365 is about new features built in-the-cloud and boosts the
    Read More

    It's not Project Spartan.. It is Microsoft Edge

    No comments:
    If you might have not seen it yet, #Edge is the name of Microsoft's all new browser that is making news everywhere. This will come pre-loaded with Windows 10 (releasing in September/October this year) for general public however at this time also, you can taste a bit of its magic in the Insider Preview of Windows 10 (aka technical preview of Windows 10).

    Take a look at the video MSFT just launched. If Microsoft deliverers what it showcases, Chrome and Firefox are at the 'edge' of losing the game.


    What you'll love 

    • It's got Cortana. The smart digital assistant that you will see on all Microsoft devices be it PC's or Tablets or Phones is deeply integrated with this masterpiece.
    • Long needed features such as direct annotations on webpages and sharing with loads of apps are coming. Cheers.
    • Its fast, familiar and powerful cross the devices.
    • Reading mode. This one is great and intelligent enough to help you read better by turning off all those annoying ads and other clutter. Just read.
    • It could just be the best browser if you have got a touch device. It is equipped with some very intuitive touch features that I presume will be mind boggling.
    Many more features like brand new UI with easy to manage thumbnails and searching only using voice commands etc. Keep the fingers crossed!

    Read More

    Office 365 Import Service - now upload PST Files directly to Office 365 Mailboxes

    No comments:

    Office 365 Import Service

    What is Office 365 Import Service

    To help migration of PST files for users with very large PST Archives, MS just released (currently in Preview) the Office 365 Import Service. Office 365 Import service is the brand new service from Microsoft can use to transfer PST files from your on-premises environment to your Exchange Online mailboxes. You can even ship your files directly to Microsoft Datacenters and MS will upload it to your mailboxes (Isn’t it great?). You have two choices to move your data into Office 365
    • You can ship drives to Microsoft.
    • You can upload files to Office 365.
    What you’ll need?
    You need to prepare a PST to user mapping file and PST files, and hard drives (if you are shipping to Microsoft). And, permissions and admin roles required for using Microsoft Import Service.
    You need to have Mailbox Import Export Admin Role in Exchange online to be able to use this service.
    Important:
    Only 3.5 inch SATA II/III hard drives are supported. Maximum size for each drive supported is 4 TB.
    Hard drive should be NTFS formatted and single volume (Microsoft will process only 1st volume discarding all subsequent drive volumes.
    Hard drives must be encrypted using BitLocker with encryption keys protected with numerical passwords. The Office 365 drive preparation tool will help with the encryption.
    Which Method of Import Service is good for you?
    If you have to transfer a large amount of data, and uploading it over the network is prohibitively expensive or not feasible, you can use the “drive shipping” service. In other cases, such as uploading smaller amounts of data, uploading PST files that were missed when you shipped the drive, and so on, you can upload the PST files over the network. Both methods result in the data getting moved into the Office 365 mailbox.
    You can determine if your data is small or large based on your network upload performance numbers (bandwidth, latency). Typically, if you have more than 10 TB of data, drive shipping is faster.
    Learn the quickie… So exactly how to use these services?
    Detailed illustrations here are given for each of the methods below. Follow the relevant links
    1. Upload to Office 365
    2. Ship to Office 365
    Go ahead and get started!

    Read More

    Assigning Mailbox Import Export Admin Role

    No comments:

    Before you can make use of Office 365 Import Service for your organization, you must be assigned mailbox import export admin role by your Global Administrator (you can assign yourself if you are the global admin). Here’s how to do it:

    Under Exchange Admin Center, go to ‘Permissions’ and select ‘Admin Roles
    Select Add Roles (+ symbol) and add Mailbox Import Export from the list of roles.


    Similarly, Add (+ sign) Members who should be assigned this role. You can select individual users as well as groups.


    Press Save and it should start customizing your organization for you. Once done, you will get the following confirmation.

    Done! Now you can go ahead and use the mailbox import-export service.

    Read More

    Connect PowerShell with Microsoft Azure

    No comments:

    You can use Windows PowerShell to perform a variety of tasks in Azure, either interactively at a command prompt or automatically through scripts. Azure PowerShell is a module that provides cmdlets to manage Azure through Windows PowerShell. You can use the cmdlets to create, test, deploy, and manage solutions and services delivered through the Azure platform. In most cases, you can use the cmdlets to perform the same tasks that you can perform through the Azure Management Portal. For example, you can create and configure cloud services, virtual machines, virtual networks, and web apps.

    Step 1:  Download and Install Microsoft Azure PowerShell Module for Microsoft Azure

    Download and install the Azure PowerShell modules by running the Microsoft Web Platform Installer
    When prompted, click Run. The Web Platform Installer installs the Azure PowerShell modules and all dependencies. Follow the prompts to complete the installation.
    Installing the module also installs a customized console for Azure PowerShell. You can run the cmdlets from either the standard Windows PowerShell console or the Azure PowerShell console.

    Step 2: Run the Microsoft Azure PowerShell

    The method you use to open either console depends on the version of Windows you're running:
    • On a computer running at least Windows 8 or Windows Server 2012, you can use the built-in Search. From the Start screen, begin typing power. This returns a scoped list of apps that includes Windows PowerShell and Azure PowerShell. To open the console, click either app. (To pin the app to the Start screen, right-click the icon.)
    • On a computer running a version earlier than Windows 8 or Windows Server 2012, use the Start menu. From the Start menu, click All Programs, click Azure, and then click Azure PowerShell

    Step 3:  Run Add-AzureAccount cmdlet.

    Step 4: Login with your Admin Credential.

    Don’t worry if you have ADFS implemented. You will automatically redirect to ADFS Page (as you do when logging into Office 365).

    Step 5:  Select Current Subscription.

    After putting credential, you should be able to see prompt like below and ready to use Windows Azure by PowerShell.
    Before you do anything, ensure you are in the right subscription. First thing you want to do is check which subscription is currently live and change if required.
    Check current Subscription: Get-AzureSubscription | select SubscriptionName, IsCurrent
    If your subscription is already showing True in the IsCurrent Column, no further actions required, else run the following command and check the results using same command (Get-AzureSubscription | select SubscriptionName, IsCurrent)
    Select-Azuresubscription
    Now, you can run any valid PowerShell command against your Azure subscription. For any help, there is a great command called Get-Help.

    Read More

    Change username and email address of users easily | Office 365 | PowerShell

    No comments:
    Okay now we see that there are quite a number of organizations are already using or migrating to Office 365 and password resets, changing usernames, email address and other log-in information for the users is one of the common day-to-day tasks that Office 365 Administrator has to deal with.

    If your company is also moving tho the excellent cloud platform, lets learn how to change usernames and email addresses of the users in Exchange Online or Office 365. Today we will talk about the easy method of doing this stuff, also we are going to share a real quick and the Administrator's way of doing this task.

    Easy way is to use Office 365 Portal or Admin Center.

    1) Login into the Admin and go to Active Users under 'Users and Groups' inside 'Office 365 Admin Center'
    2) Select the user (check box in front of it) to 'Edit' under Primary Email Address

    3) Click Add New


    4) Change Email Address as desired. Do not forget the domain part. By Default, it should be showing your *.onmicrosoft.com domain. Change accordingly.

    Important to notice there is a check box to make this email address as Primary. This means all outgoing emails will be showing this id in the 'from' field to the recipients.


    5) This warning message means that your user will be using this email id to login now onward.


    6) Now click Save.


    Done! Changes should reflect immediately!

    And, now, if you also think it is not practical to follow these all these steps every time you need to make these changes, you can use the following great PowerShell command:

    Set-MsolUserPrincipalName -userprincipalname  -NewUserPrincipalName


    You can run this powershell command set from your own computer. To run this powershell, the computer must have:
    Read More

    Export a list of mobile devices active in your Exchange Online Organization | Office 365

    No comments:
    Exchange ActiveSync

    Yeah, I know its much awaited feature in Office 365, and more or less, there is very little information available on the internet about this at this time. To be true, there is now a method of exporting list of devices that run exchange ActiveSync on mobile devices. Here is goes:


    $MailBox = Get-Mailbox -ResultSize Unlimited
    $MailBox | %{$PrimarySmtpAddress=$_.PrimarySmtpAddress; Get-ActiveSyncDeviceStatistics -Mailbox $_.Identity | Select-Object @{Name="PrimarySmtpAddress";Expression={$PrimarySmtpAddress}}, DeviceType, DeviceOS, DeviceMobileOperator, LastSyncAttemptTime} | Export-CSV "D:\ActiveSyncDevices.csv" -Encoding utf8 -NoTypeInformation -Delimiter ";"

    The above commands will export all information about your mobile devices configured with last sync time by your users like mobile device, device type, device family and even mobile operator.

    Enjoy!!

    Read More

    To migrate Gmail calendar to Office 365

    No comments:
    Migrating Google Calendars to Office 365


    You copy calendar items from Gmail to Office 365 by exporting the Gmail calendar items as an iCal file. After you save the iCal file, you’ll use Outlook to import calendar items into the Outlook Calendar.

    To migrate Gmail calendar to Office 365

    1. Sign in to Google Apps as a user whose calendar you want to migrate to Office 365.
    2. Choose Calendar > My Calendars > Settings > Export Calendars.
    3. Select a location to save your file.
    Gmail saves the iCal file as a compressed file. Unzip the file before you proceed to the next step.
    1. In Outlook, choose Calendar > File > Open & Export > Import/Export > Import an iCalendar (.ics) or vCalendar file (.vcs) > Next.
    2. Choose Comma Separated Values and then select the iCalendar file you saved in step 2, above.
    3. Choose to import the calendar when asked to open it as a new calendar or for import.
    4. Choose Outlook calendar > Finish.
    5. You should now see the Gmail calendar items within the Outlook calendar.

    Now that the user’s Gmail calendar entries have been copied over to Office 365, the user can view them by using Outlook or Outlook Web Access. If the user adds new calendar entries in Gmail, they won’t be automatically copied over to Office 365. The user will have to add the calendar entries into Office 365by hand or you’ll have to run the calendar import process again.
    Read More