Latest Posts

Identify and fix validation or other errors with a user in Office 365 | Hybrid Identity

No comments:

When dealing with user sync issues sometimes you encounter with a user that has a directory sync error evident in the MSOLUser properties. 
How do you extract actual error details to understand what you may need to do to fix it? 

You can run this cmdlets:

$user = "username@domain.com"

Get-MsolUser -UserPrincipalName $user | Select-Object DisplayName,UserPrincipalName,ObjectId,@{Name="Error";Expression={($_.errors[0].ErrorDetail.objecterrors.errorrecord.ErrorDescription)}} | FL


If there are any errors with the user, you will likely get information about it this way. 


Read More

WID service was unable to log on as NT SERVICE\MSSQL$MICROSOFT while installing WID (ADFS)

No comments:

You are installing/re-installing WID and receive the following error:

The MSSQL$MICROSOFT##WID service was unable to log on as NT SERVICE\MSSQL$MICROSOFT##WID with the currently configured password due to the following error:

Logon failure: the user has not been granted the requested logon type at this computer.

Service: MSSQL$MICROSOFT##WID

Domain and account: NT SERVICE\MSSQL$MICROSOFT##WID

This service account does not have the required user right "Log on as a service."


The cause of this error is that the local virtual account NT SERVICE\MSSQL$MICROSOFT##WID created when installing WID. This account is granted the "Log on as a service" user right by the local Group Policy.

However, if a Group Policy Object (GPO) overwrites the local Group Policy setting, the account will not have the necessary user rights, leading to WID installation failure.

To resolve this error, you can assign the "Log on as a service" user right to the service account on your computer or directly in the Group Policy Object. 


Read More

Outlook's Credential Prompts when access exchange online archives

No comments:
Have you ever encountered a frustrating issue while trying to access your in Outlook, where you are prompted to enter your credentials repeatedly? My team faced this issue recently across multiple Exchange online users, and it caused a lot of disruptions to work. After researching the problem, this issue occurs due to a specific Autodiscover call for the Archive Mailbox, which is going to the 'Root Domain.'

A third-party server answers the 'Root Domain' call, and it should not be returning a 401 for Autodiscover calls. This caused Outlook to believe that it needed to authenticate, and as a result, it ended up prompting me after the cached credentials failed.

We analyzed the problem by collecting data from my Outlook Advanced Logs and Fiddler Traces. This showed that the Root Domain call was causing the issue and that it was an expected Outlook behavior.

Next, I deployed the 'ExcludeHttpsRootDomain' Registry Key on a machine. This prevented the Basic Auth looking prompt and allowed Outlook to avoid the Root Domain call altogether. After relaunching Outlook, the issue was resolved, and the Autodiscover calls for the Primary and Archive mailboxes were successful.
Microsoft later recognized the issue being caused for multiple customers and suggested the fix we deployed was correct. In conclusion, if you are facing a similar issue with Outlook credential prompts for archive mailboxes, you can follow this multi-step process to resolve it. Start by analyzing the problem and collecting data from your Outlook Advanced Logs and Fiddler Traces.
Issue Some users are having issues with Credential Prompts for Archive Mailboxes in Outlook Analysis - We collected data from an affected user including Outlook Advanced Logs and Fiddler Traces - This showed us the prompting is coming from specific Autodiscover calls for the Archive Mailbox which is going to the ‘Root Domain’: POST https://<Domain here>/autodiscover/autodiscover.xml 401 Authorization Required (text/html) - The Root Domain call is answered by a 3rd party server and should not be returning a 401 for Autodiscover calls: Server: IdeaWebServer/5.1.0 - Since the server is retuning a 401 instead of a 500 or other hard failure, Outlook believes it needs to authenticate and ends up prompting after the cached credentials all fail - This ‘Root Domain’ call is By Design Outlook behavior - This Authentication Failure state is due to the Basic Authentication prompt which prevents proper Authentication using Modern Authentication for all subsequent connections, not just the Autodiscover call - Outlook shows a ‘Need Password’ indicator at the bottom of the screen and clicking this allows Modern Authentication to proceed again - That resolves the disconnected state, and the Primary and Archive connections succeed as expected - We deployed the ‘ExcludeHttpsRootDomain’ Registry Key on the affected client machine, relaunched Outlook and the issue was resolved: https://learn.microsoft.com/en-us/outlook/troubleshoot/profiles-and-accounts/unexpected-autodiscover-behavior - This prevented the Basic Auth prompting and allowed Outlook to avoid the Root Domain call altogether as it is not expected to succeed on this environment - A Fiddler trace after the change showed us the Autodiscover calls for the Primary and Archive mailboxes were then successful and no issue with the connectivity
Read More

Azure AD Connect Profile Sequence

No comments:

What are the steps involved if you have many AD DS environments configured to sync via AAD Connect (of MIM for that matter) and you need to run just one of them manually?


Run the profiles in the below sequence:


Delta Import - AD

Delta Import  - WAAD

Delta Sync  - AD

Delta Sync - WAAD

Export - WAAD

Export - AD

Read More

Check if a computer is part of a domain or not (and which Active Directory Domain)

No comments:
One of the quickest way of checking if a computer you are on is Workgroup joined or domain joined for admins is by Going to the Settings > System > About > Advanced System Settings> Computer Name 

Alternatively, you can also do a right click on the My Computer folder > Properties > Advanced.


A quicker way of getting to the information (while also finding more helpful information about the computers is to use Get-ComputerInfo cmdlet. You can use it like:

Get-ComputerInfo | select *domain*

For personal machines (not joined to any domains) it will show up under the csdomain as WORKGROUP and CsPartOfDomain as FALSE


For domain joined machines, these parameters will show the name of the domain it is joined to. Also, you can note which type of the server it is (e.g. Memberserver, DomainController, PimaryDomainController etc.) under the CsDomainRole


Read More

How to Force Active Directory replication between Domain Controllers

No comments:

By Default, the domain controllers in an Active Directory Domain sync ~15 minutes. The time to finish the replication itself may be as short as a few seconds to several minutes depending on the size of the Forest, Number of Domain Controllers, their physical location, and the type of connectivity between the sites. 

Sometimes, you make a change in one of the DCs and then have to wait for it to synchronize to other domain controllers. If you don't want to wait for long, how do you force the sync to see the change replicate immediately in all your DCs, or the particular DC you are on?  

There is a cool & nifty cmdline utility called REPADMIN which can be your friend. It lets you do an on-demand sync of AD objects to, and from your domain controllers. It is the same utility that we often use to detect and troubleshoot AD replication issues in your environments. Here's how you can use it. 

The tool is quite rich and has many ways of use. You can supply the right parameter and flags to do a variety of actions. I'd show you how to use it to do an on-demand sync to or from DCs in two modes: Pull and Push.

#1 PULL Mode i.e. A change made in another DC needs to sync to this DC (where the cmd is run) 

Open elevated CMD or PowerShell i.e. Run as Administrator on your DC and run the following: 

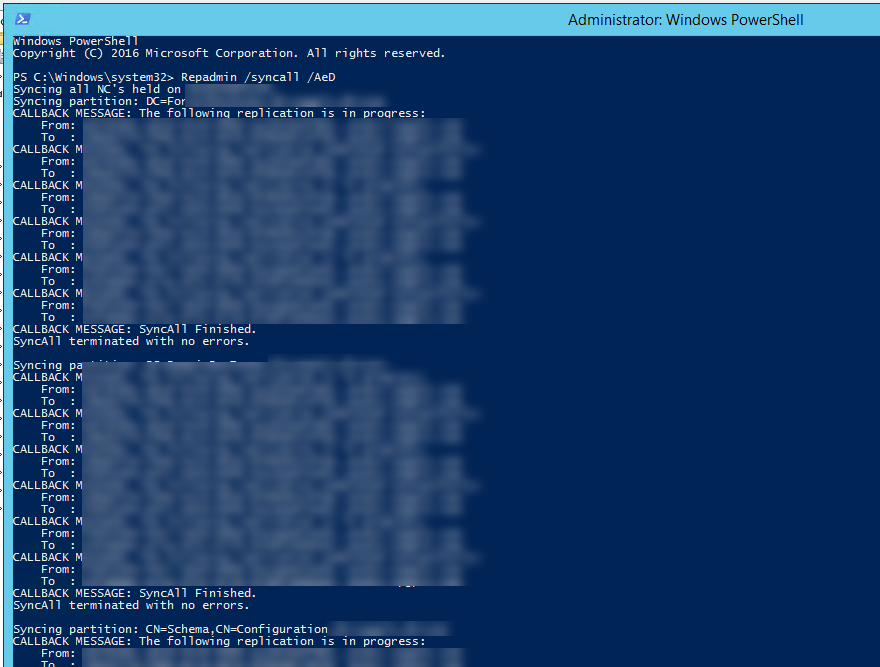
Repadmin /syncall /AeD

This cmdlet will Pull the changes it detects on other available DCs to the DC where its run. Pull is the AD's default way of syncing. 

The output should look similar. 


# 2 PUSH Mode i.e. A change made on your DC (where the cmd is run) and want to immediately push it to other DCs

Open elevated CMD or PowerShell i.e. Run as Administrator on your DC and run the following: 

Repadmin /syncall /APeD


In the above cmdlet, A, e, D and P are flags you specify to the repadmin utility. 

A = All Partitions

e = Enterprise (Cross Site)

D = Identify servers by distinguished name in messages.

P = Push

There are more flags you can read from this Microsoft page

Read More

How to Export Microsoft 365 users to CSV by domains via PowerShell

No comments:

This one is simple, yet something comes my way occasionally. So here's the simplest way of identifying all users using a domains in your Azure AD Tenant / Microsoft 365. 

You can get a report of all users using a domain using the below cmdlets. You will be prompted to specify the domain name when you run. Repeat the script if you have to search multiple domains.


 # Find Users by domain (includes search in proxy addresses)

Connect-msolservice

$domainname = read-host "Enter the domain name to get users for"

$domain_users= Get-Msoluser -DomainName $domainname -all| Where-Object { $_.UserPrincipalName -like "*$domainname"}

Write-host "Found $($domain_users.count) users in this domain."

$domain_users | select DisplayName,FirstName,LastName,UsageLocation,UserPrincipalName,Islicensed,@{L = "ProxyAddresses"; E = { $_.ProxyAddresses -join ";"}} | Export-csv .\MSOL_Users.csv -notypeinformation -Append


# Find Users by domain (UPN only)

Connect-msolservice

$domainname = read-host "Enter the domain name to get users for"

$domain_users= Get-Msoluser -DomainName $domainname -all| Where-Object { $_.UserPrincipalName -like "*$domainname"}

Write-host "Found $($domain_users.count) users in this domain."

$domain_users | select DisplayName,FirstName,LastName,UsageLocation,UserPrincipalName,Islicensed,@{L = "ProxyAddresses"; E = { $_.ProxyAddresses -join ";"}} | Export-csv .\MSOL_Users-UPN-only.csv -notypeinformation -Append


Read More

Bulk update ProxyAddresses in AD using UserPrincipalName | Set-Aduser

No comments:

A colleague asked for help in updating proxy addresses for multiple users in the local AD. Easy to guess, PowerShell was the answer for bulk changes. Challenge was they only had UPNs or UserPrincipalName and ProxyAddresses available with them which made it slightly non-standard. 

Typically, the scripts you run in the AD use 'sAMAccountName' to identify the users uniquely. They didn't have it. And we did not want to run multiple other processes to get sAMAccountName for all the UPNs. 

On a side note, it is quite a straight-forward task to update attributes for multiple users in the Active Directory using PowerShell. Most attributes can be manipulated easily, however updating ProxyAddresses can be a challenge. This is because it is a multi-valued attribute capable of holding different values.

So, is it possible to update ProxyAddresses for users in bulk using PowerShell with starting with just the UPNs? Yes - just follow the below mentioned steps. If you already have a list of users and the proxy addresses you want to set for them, go straight to step 4. :)

# Step 1: Get a list of users to change. Save the file as C:\Temp\UserList.csv


# Checking Preview of the CSV File in PowerShell

Set-Location C:\temp

Import-Csv UserList.csv 


# Step 2: Check current ProxyAddresses - GET ONLY (Optional step) | Save CSV

Import-Csv UserList.csv | ForEach {

  Get-ADUser -Filter "UserPrincipalName -eq '$($_.UserPrincipalName)'" -Properties SamAccountNAme, ProxyAddresses, UserPrincipalName `

  | Select-Object UserPrincipalName, SamAccountNAme, @{L = "ProxyAddresses"; E = { $_.ProxyAddresses -join ";"}} `

  | Export-Csv -Path C:\Temp\CurrentProxyAddresses.csv -NoTypeInformation -Append

  } 


# Step 3: Edit the exported file with desired changes to the CSV file. Save it as "BulkUpdateProxyAddresses.csv" Use Notepad or Excel to edit it.


# Step 4: See preview of the new file 

Import-Csv BulkUpdateProxyAddresses.csv 


# Step 5: Set ProxyAddresses according to file - REPLACE Mode

Import-Csv BulkUpdateProxyAddresses.csv | ForEach {

Get-ADUser -Filter "UserPrincipalName -eq '$($_.UserPrincipalName)'" -Properties SamAccountNAme, ProxyAddresses, UserPrincipalName `

  | Set-ADUser -Replace @{ProxyAddresses= $($_.ProxyAddresses -split ";") } `

  }


# Step 6: Finally, see the change in local AD and or cmdlet used in step 2 (Remember to use a different filename this time e.g. CurrentProxyAddresses-UPDATED.csv  )

Import-Csv UserList.csv | ForEach {

  Get-ADUser -Filter "UserPrincipalName -eq '$($_.UserPrincipalName)'" -Properties SamAccountNAme, ProxyAddresses, UserPrincipalName `

  | Select-Object UserPrincipalName, SamAccountNAme, @{L = "ProxyAddresses"; E = { $_.ProxyAddresses -join ";"}} `

  | Export-Csv -Path C:\Temp\CurrentProxyAddresses-UPDATED.csv -NoTypeInformation -Append

  } 


Great job! Now verify the changes are visible in the local AD.


Read More

How to change UPNs in Active Directory and Office 365 in bulk with PowerShell Script

No comments:

What is UserPrincipalName?

The UserPrincipalName attribute value is the Azure AD username for the user accounts.

A UPN consists of a UPN prefix (the user account name) and a UPN suffix (a DNS domain name). The prefix is joined with the suffix using the "@" symbol.

For example, "someone@example.com". A UPN must be unique among all security principal objects within a directory forest.

The UPN is used by Azure AD to allow users to sign-in. The UPN that a user can use, depends on whether the domain has been verified. If the domain has been verified, then a user with that suffix will be allowed to sign-in to Azure AD.

Important:

UPN in Azure AD is unique across the Azure AD Tenant and no two users can have the same UPN.

UPN for the users syncs only once via directory sync process (MIM and Azure AD Connect). Subsequent changes to UPN attribute for any users must be repeated in the Azure AD / Office 365 separately via GUI or PowerShell.

How to find UPNs for users in Office 365?

To get a list of the users with their UPNs, you can connect to Office 365 via PowerShell using M365 admin accounts and run the following cmdlets.

Import-Module MSONLINE

Connect-MSOLSERVICE

Get-msoluser -All | Select-Object DisplayName, FirstName, LastName, UsageLocation, UserPrincipalName, UserType, @{L = "ProxyAddresses"; E = { $_.ProxyAddresses -join ";"}} | Export-Csv -Path E:\Temp\MSOL_Users_25OCT2021.csv -NoTypeInformation


The script generates the following output file ‘E:\Temp\MSOL_Users_25OCT202.csv’. The cmdlets assume ‘E:\Temp\’ directory exists, and the user has ‘write’ access to the location. You can change this path to suit your preferences.

To check a single user, just run one simple cmdlet (after connecting to PowerShell):


Get-msoluser -UserPrincipalName <username> | Select-Object DisplayName, FirstName, LastName, PreferredLanguage, UsageLocation, UserPrincipalName


How to Change UPN for users

Changing UPN for users synced from the local AD is a two-step process. Changes done to UPN in the local AD cannot be synced automatically to the cloud via directory synchronization services like Microsoft Identity Manager or Azure AD Connect.

  1. Change the UPN in the local AD
  2. Change the UPN in the Azure AD

Step 1: Change the UPN in the local AD

Changing UPN in the Local AD is can be done from AD management tools such as Active Directory Administration Center, Active Directory Users and Computers (dsa.msc) or ADSI Edit.

Changing Single user:

To change a single user, update the AD attribute via the GUI tools or PowerShell.


To change multiple uses at once, PowerShell is recommended.

·     Note: Following the change in the local AD, continue to step 2 to make change in the Azure AD too. If the users you are changing are ‘in-cloud’, skip directly to step 2.

Changing multiple users (in bulk): There are multiple methods are doing this in bulk. Two have been included for this guide.

Method 1: By CSV file

1.      Prepare CSV file of users in the below format. Save the file as ‘Change-UPN-AD-Users.csv’. You can use any other file name. Just remember to use it in the next step if you change it.
Example CSV format:

SamAccountName

NewUserprincipalname

sandeep.verma

Sandeep.verma.NEWUPN@domain.com


2.  Type the following and hit enter when completed:


Import-Module ActiveDirectory

Import-Csv .\Change-UPN-AD-Users.csv | foreach-object {
Write-host “Changing UPN for user $($_.SamAccountName) to $($_.NewUserPrincipalName)” -Foregroundcolor Cyan

Set-ADUser -identity $_.SamAccountName -userprincipalname $_.Newuserprincipalname }

3.   Verify by GUI or PowerShell.

Import-Csv .\Change-UPN-AD-Users.csv | foreach-object {Get-ADUser -identity $_.SamAccountName | Select SamAccountName, UserPrincipalName

Method 2: By OU

You can also make changes to UPNs at OU level i.e. all users in the OU you select will get changed to a new domain name you specify. For example, all users un the test OU ‘TestOU’ have ‘vermasandeep.local’ as the UPN suffix and need to be changed to the UPN suffix ‘vermasandeep.in’.

1.      Open PowerShell ISE with appropriate admin permissions.

2.      Type the following and hit enter when completed (change $ou and $server as your OU and Server names):

Import-Module ActiveDirectory

$oldSuffix = "vermasandeep.local"

$newSuffix = "vermasandeep.in"

$ou = "OU = TestOU, DC=VERMASANDEEP, DC=local"

$server = "DCM1"

Get-ADUser -SearchBase $ou -filter * | ForEach-Object {

$newUpn = $_.UserPrincipalName.Replace($oldSuffix,$newSuffix)

$_ | Set-ADUser -server $server -UserPrincipalName $newUpn

}

Note: $oldSuffix represents the old domain UPN suffix. $newSuffix represents the new UPN suffix. $ou represents the search path in which and IT professional can use a specific OU or an entire domain.

3.      Verify by GUI or PowerShell.

$ou = "OU=TestOU,DC=VERMASANDEEP,DC=local"

Get-ADUser -SearchBase $ou -filter * | Select SamAccountName, UserPrincipalName


 Step 2: Change the UPN in the Azure AD

To change a single user’s UPN in the Azure AD, you can use the following cmdet.

Import-Module MSONLINE

Connect-MSOLSERVICE

Set-MsolUserPrincipalName -UserPrincipalName <Current UPN> -NewUserPrincipalName <New UPN>

For bulk changes, below mentioned PowerShell script is recommended.

1.      Prepare CSV file of users in the below format. Save the file as ‘Change-UPN-AzureAD-Users.csv’. You can use any other file name. Just remember to use it in the next step if you change it.
Example CSV format:

SamAccountName

NewUserprincipalName

sandeep.verma

Sandeep.verma.NEWUPN@domain.com


2.     Type the following and hit enter when completed:

        Import-Module MSONLINE

 Connect-MSOLSERVICE

 Import-Csv .\Change-UPN-AzureAD-Users.csv | foreach-object {

Write-host “Changing UPN for user $($_.UserPrincipalName) to $($_.NewUserPrincipalName)” -Foregroundcolor Cyan

Set-MsolUserPrincipalName -UserPrincipalName $_.UserPrincipalName -NewUserPrincipalName $_.NewUserPrincipalName }

3. Verify by GUI or PowerShell.

Import-Csv .\Change-UPN-AD-Users.csv | foreach-object {Get-ADUser -identity $_.SamAccountName | Select SamAccountName, UserPrincipalName


Note:

If you try changing the UPN from a managed domain to a federated domain, the following error will appear.


Set-MsolUserPrincipalName : You must provide a required property: Parameter name: FederatedUser.SourceAnchor

If you have such a scenario, leave a comment for help.

Checking results

Once the script above has been run successfully, use the following PowerShell cmdlets to check the new UPNs.

Import-Module MSONLINE

Connect-MSOLSERVICE

Get-msoluser -All | Select-Object DisplayName, FirstName, LastName, UsageLocation, UserPrincipalName, UserType, @{L = "ProxyAddresses"; E = { $_.ProxyAddresses -join ";"}} | Export-Csv -Path E:\Temp\MSOL_Users_25OCT2021.csv -NoTypeInformation


Read More

Skype for Business Online PowerShell connections are blocked

No comments:

Issue: 

You as a Global Admin or Skype for business Admin or Teams Administrator cannot connect to Skype for Business PowerShell Module. The Error that appears is as follows:

New-PSSession : [admin0a.online.lync.com] Processing data from remote server admin0a.online.lync.com failed with the

following error message: Skype for Business Online PowerShell connections are blocked.

Cause

Microsoft has discontinued the Skype for Business Online PowerShell module and you cannot download the old powershell module anymore. If you have the module already installed on your machine and you try to connect to the service, you get the above mentioned error. 

Teams administrator were notified through Message center post (MC244740, dated March 16, 2021; MC250940, dated April 16 2021) about this change.

Solution

You can update the Microsoft Teams PowerShell on the machine and use it to connect the online service using PowerShell.

# Open PowerShell as an Administrator, and use update-module cmdlet. 

Update-Module MicrosoftTeams 

Once Updated, you can connect to Microsoft Teams using the Connect-MicrosoftTeams Cmdlet

Connect-MicrosoftTeams


Read More