Latest Posts

Showing posts with label Office 365. Show all posts

How to change UPNs in Active Directory and Office 365 in bulk with PowerShell Script

No comments:

What is UserPrincipalName?

The UserPrincipalName attribute value is the Azure AD username for the user accounts.

A UPN consists of a UPN prefix (the user account name) and a UPN suffix (a DNS domain name). The prefix is joined with the suffix using the "@" symbol.

For example, "someone@example.com". A UPN must be unique among all security principal objects within a directory forest.

The UPN is used by Azure AD to allow users to sign-in. The UPN that a user can use, depends on whether the domain has been verified. If the domain has been verified, then a user with that suffix will be allowed to sign-in to Azure AD.

Important:

UPN in Azure AD is unique across the Azure AD Tenant and no two users can have the same UPN.

UPN for the users syncs only once via directory sync process (MIM and Azure AD Connect). Subsequent changes to UPN attribute for any users must be repeated in the Azure AD / Office 365 separately via GUI or PowerShell.

How to find UPNs for users in Office 365?

To get a list of the users with their UPNs, you can connect to Office 365 via PowerShell using M365 admin accounts and run the following cmdlets.

Import-Module MSONLINE

Connect-MSOLSERVICE

Get-msoluser -All | Select-Object DisplayName, FirstName, LastName, UsageLocation, UserPrincipalName, UserType, @{L = "ProxyAddresses"; E = { $_.ProxyAddresses -join ";"}} | Export-Csv -Path E:\Temp\MSOL_Users_25OCT2021.csv -NoTypeInformation


The script generates the following output file ‘E:\Temp\MSOL_Users_25OCT202.csv’. The cmdlets assume ‘E:\Temp\’ directory exists, and the user has ‘write’ access to the location. You can change this path to suit your preferences.

To check a single user, just run one simple cmdlet (after connecting to PowerShell):


Get-msoluser -UserPrincipalName <username> | Select-Object DisplayName, FirstName, LastName, PreferredLanguage, UsageLocation, UserPrincipalName


How to Change UPN for users

Changing UPN for users synced from the local AD is a two-step process. Changes done to UPN in the local AD cannot be synced automatically to the cloud via directory synchronization services like Microsoft Identity Manager or Azure AD Connect.

  1. Change the UPN in the local AD
  2. Change the UPN in the Azure AD

Step 1: Change the UPN in the local AD

Changing UPN in the Local AD is can be done from AD management tools such as Active Directory Administration Center, Active Directory Users and Computers (dsa.msc) or ADSI Edit.

Changing Single user:

To change a single user, update the AD attribute via the GUI tools or PowerShell.


To change multiple uses at once, PowerShell is recommended.

·     Note: Following the change in the local AD, continue to step 2 to make change in the Azure AD too. If the users you are changing are ‘in-cloud’, skip directly to step 2.

Changing multiple users (in bulk): There are multiple methods are doing this in bulk. Two have been included for this guide.

Method 1: By CSV file

1.      Prepare CSV file of users in the below format. Save the file as ‘Change-UPN-AD-Users.csv’. You can use any other file name. Just remember to use it in the next step if you change it.
Example CSV format:

SamAccountName

NewUserprincipalname

sandeep.verma

Sandeep.verma.NEWUPN@domain.com


2.  Type the following and hit enter when completed:


Import-Module ActiveDirectory

Import-Csv .\Change-UPN-AD-Users.csv | foreach-object {
Write-host “Changing UPN for user $($_.SamAccountName) to $($_.NewUserPrincipalName)” -Foregroundcolor Cyan

Set-ADUser -identity $_.SamAccountName -userprincipalname $_.Newuserprincipalname }

3.   Verify by GUI or PowerShell.

Import-Csv .\Change-UPN-AD-Users.csv | foreach-object {Get-ADUser -identity $_.SamAccountName | Select SamAccountName, UserPrincipalName

Method 2: By OU

You can also make changes to UPNs at OU level i.e. all users in the OU you select will get changed to a new domain name you specify. For example, all users un the test OU ‘TestOU’ have ‘vermasandeep.local’ as the UPN suffix and need to be changed to the UPN suffix ‘vermasandeep.in’.

1.      Open PowerShell ISE with appropriate admin permissions.

2.      Type the following and hit enter when completed (change $ou and $server as your OU and Server names):

Import-Module ActiveDirectory

$oldSuffix = "vermasandeep.local"

$newSuffix = "vermasandeep.in"

$ou = "OU = TestOU, DC=VERMASANDEEP, DC=local"

$server = "DCM1"

Get-ADUser -SearchBase $ou -filter * | ForEach-Object {

$newUpn = $_.UserPrincipalName.Replace($oldSuffix,$newSuffix)

$_ | Set-ADUser -server $server -UserPrincipalName $newUpn

}

Note: $oldSuffix represents the old domain UPN suffix. $newSuffix represents the new UPN suffix. $ou represents the search path in which and IT professional can use a specific OU or an entire domain.

3.      Verify by GUI or PowerShell.

$ou = "OU=TestOU,DC=VERMASANDEEP,DC=local"

Get-ADUser -SearchBase $ou -filter * | Select SamAccountName, UserPrincipalName


 Step 2: Change the UPN in the Azure AD

To change a single user’s UPN in the Azure AD, you can use the following cmdet.

Import-Module MSONLINE

Connect-MSOLSERVICE

Set-MsolUserPrincipalName -UserPrincipalName <Current UPN> -NewUserPrincipalName <New UPN>

For bulk changes, below mentioned PowerShell script is recommended.

1.      Prepare CSV file of users in the below format. Save the file as ‘Change-UPN-AzureAD-Users.csv’. You can use any other file name. Just remember to use it in the next step if you change it.
Example CSV format:

SamAccountName

NewUserprincipalName

sandeep.verma

Sandeep.verma.NEWUPN@domain.com


2.     Type the following and hit enter when completed:

        Import-Module MSONLINE

 Connect-MSOLSERVICE

 Import-Csv .\Change-UPN-AzureAD-Users.csv | foreach-object {

Write-host “Changing UPN for user $($_.UserPrincipalName) to $($_.NewUserPrincipalName)” -Foregroundcolor Cyan

Set-MsolUserPrincipalName -UserPrincipalName $_.UserPrincipalName -NewUserPrincipalName $_.NewUserPrincipalName }

3. Verify by GUI or PowerShell.

Import-Csv .\Change-UPN-AD-Users.csv | foreach-object {Get-ADUser -identity $_.SamAccountName | Select SamAccountName, UserPrincipalName


Note:

If you try changing the UPN from a managed domain to a federated domain, the following error will appear.


Set-MsolUserPrincipalName : You must provide a required property: Parameter name: FederatedUser.SourceAnchor

If you have such a scenario, leave a comment for help.

Checking results

Once the script above has been run successfully, use the following PowerShell cmdlets to check the new UPNs.

Import-Module MSONLINE

Connect-MSOLSERVICE

Get-msoluser -All | Select-Object DisplayName, FirstName, LastName, UsageLocation, UserPrincipalName, UserType, @{L = "ProxyAddresses"; E = { $_.ProxyAddresses -join ";"}} | Export-Csv -Path E:\Temp\MSOL_Users_25OCT2021.csv -NoTypeInformation


Read More

Retaining leaver's data in Microsoft 365 - Onedrive for business

No comments:


In most organisations, compliance with data retention policies is driven by statutory or legal requirements. By default, when a person disassociates from the company, email/One Drive for Business is retained for a month of deletion of the account. To avoid permanent deletion of the data after 30 day period, you can use Inactive mailbox or Shared mailbox features to forever keep the mailbox contents within the service (for FREE!), but OneDrive data needs to be handled manually (or automated by a separate process which is beyond the scope of this article). One Drive for Business data can be copied to SharePoint sites and kept for reference purpose.

Microsoft 365 Data retention policies can be customised to meet your specific business, legal requirements. Standard behaviour when a user is deleted from AD or unlicensed in O365 is you have 30 days to recover the mailbox and OneDrive content. SharePoint and Yammer data is not lost when the user leaves.

If you are synchronising your Active Directory (AD) with Azure AD by Azure AD Connect, you should consider populating the manager attribute in local AD. If you use accounts created directly in the Cloud, Manager can be set within the Office 365 Exchange Admin Center or Azure AD. With the manager attribute populated the users ‘manager’ is provided access to their OneDrive site contents automatically upon deletion of the account. They are notified by automatic emails as well  - one notification immediately upon deletion (i.e. 30 days before permanent deletion) and one a week before permanent deletion. They can decide if the content is worth keeping or not. If they need the contents, from within the OneDrive site, files and folders can be moved or copied to another SharePoint sites. Alternatively, they can 'sync' the location to a Windows machine using OneDrive sync client.

Version control is enabled by default for OneDrive and SharePoint. So, a user can go as far back as they want to assuming the version wasn’t deleted manually.
OneDrive keeps the deleted items in its recycle bin for a maximum 30 days. To restore deleted files from OneDrive in Windows 10, follow the instruction in below part.

STEP 1. Right-click OneDrive icon and select view online;
STEP 2. Sign in your OneDrive account on the OneDrive for business;
STEP 3. Click the Recycle Bin button on the left pane;

recover OneDrive deleted files from recycle bin within 30 days

STEP 4. All the deleted files and folders will be displayed on the right pane. To restore specific files or folders, pick them by selecting their checkbox; to restore all items, tap or click Restore all items.

NOTE: When you delete files on OneDrive using File Explorer, they're moved to your computer's desktop Recycle Bin. You can simply restore them from there unless you emptied Windows Recycle Bin or Recycle Bin is overflowing, by then old items would be removed automatically.

This page includes some details about OneDrive for Business site retention and deletion i.e. process followed when OneDrive site is deleted.

Note - 
Retention policies always take precedence to the standard OneDrive deletion process, so content included in a policy could be deleted before 30 days or retained for longer than the OneDrive retention. For more info, see Overview of retention policies. Likewise, if a OneDrive is put on hold as part of an eDiscovery case, managers and secondary owners will be sent email about the pending deletion, but the OneDrive won't be deleted until the hold is removed.

The retention period for cleanup of OneDrive begins when a user account is deleted from Azure Active Directory. No other action will cause the cleanup process to occur, including blocking the user from signing in or removing the user's license. For info about removing a user's license, see Remove licenses from users in Office 365 for business.
Read More

Disable Self Service Purchase for Microsoft Power Platform (PowerBI, PowerAutomate, PowerApps)

No comments:
Microsoft requires you to be a Global Administrator or a Billing Administrator if you want to purchase any subscription within Office 365. This holds true no more!

Starting 14 January 2020, Microsoft is giving this control to end-users for its Microsoft Power Platform which currently has three apps  - PowerBI, PowerAutomate (Flow) and PowerApps. With this change, the end-users can really 'Self-Purchase' the subscriptions for these three apps as well as the new apps which will get launched under Power Platform in future.

For now, this change only applies to the Power platform and not other traditional plans like E1/E3/E5. 

While this change can make it easier and faster for your users to access and consume Power platform apps like PowerBI Pro a faster, it can significantly swell your bills as users may start purchasing service they don't necessarily need, or business won't approve for everyone.


Don't worry, it's not too late. You CAN turn this OFF so things go back to normal once again. You'd need to run the following PowerShell Cmdlets -

Step 1. Install PowerShell Module "MSCommerce"


Import-Module -Name MSCommerce 
Connect-MSCommerce


Step 2. Check how your tenant is currently set for these new controls


Get-MSCommerceProductPolicies -PolicyId AllowSelfServicePurchase


As of today, you see three products - Power Apps, Power BI Pro and Power Automate based on the subscriptions your tenant has.

Step 3. Disable the Self-Service Purchase Options for your subscriptions


Import-Module -Name MSCommerce
Connect-MSCommerceGet-MSCommerceProductPolicies -PolicyId AllowSelfServicePurchase | Where { $_.PolicyValue -eq “Enabled”} | forEach {Update-MSCommerceProductPolicy -PolicyId AllowSelfServicePurchase -ProductId $_.ProductID -Enabled $false  }


Above code disables ALL services at the same time. If you prefer disabling only one service at a time, you can use a line similar to below for 'Power Automate'


Update-MSCommerceProductPolicy -PolicyId AllowSelfServicePurchase -ProductId CFQ7TTC0KP0N -Enabled $False 


Once this cmdlet is run you can see the change by running cmd from step 2 again -


Read More

Important information about your Office 365 single sign-on deployment

No comments:
“Dear Administrator,

In order to provide your organization with uninterrupted access to Office 365 and Microsoft Azure Active Directory (Azure AD), you need to ensure your certificate for the domain(s) mydomain.com is renewed and updated in Azure AD right away.”


This alert may raise a few hair strands if you are new to ADFS, or just seeing the alert for the first time. You are indeed receiving this alert because Microsoft was not able to automatically check for updates on your ADFS token signing certificates in, hence unable to update them in Azure AD. There are other possible reasons like AD FS server’s federation metadata is not published externally, or simply because are using a 3rd party STS. I’ll focus this article only for ADFS scenarios. 


If you’ve received such alert from MSFT about a possible incorrect configuration of your ADFS for one or more federated domains. To ensure your users keep enjoying the office 365 services uninterruptedly, you should check the following from your Primary ADFS Server.


1. ADFS Certificates

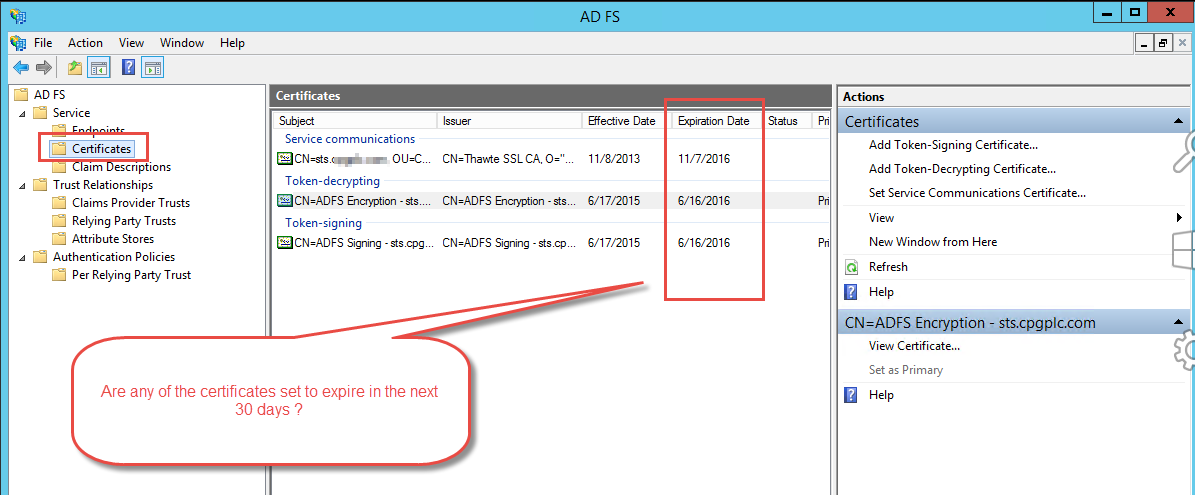
ADFS certificates can be checked from the ADFS Management Snap-in, or PowerShell (get-adfscertificate). Please check the following to confirm that the certificates are valid and can be automatically updated before expiry. All ADFS certificates should be currently valid i.e. Not Expired. 

Service Communication certificates:

Service Communication certificates need to be replaced manually. I'll write another article for the steps.


Token signing and decrypting certificates

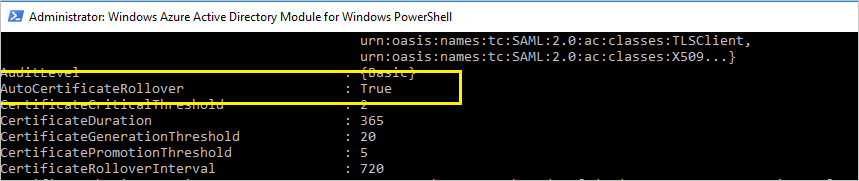
For these certificates, the AD FS property AutoCertificateRollover should be set True. This ensures AD FS will automatically generate new token signing and token decryption certificates before the old ones expire. Token Decrypting and Token signing certificates are self-signed. New certificates are generated before the expiry of current ones if you turn AutoCertRollover True in your ADFS Properties. Newly generated certificates are first set secondary before they are automatically promoted to primary certificates, 5 days before the expiry of old certificates.  

Get-AdfsProperties | select *Cert*

Administrator: Windows Azure Active Directory Module for Windows PowerSheII 
utoCertificateR0110ver 
ertificateDuration 
ertificateGenerationThresh01d 
ertificatePromotionThresh01d 
ertificateR0110verInterva1 
urn : oasis: names : SAML : 2.8: ac:classes: TLSClient, 
urn :oasis: names :SAML : 2.8: ac:classes :XSB9... } 
. True 
365 
. 728


To save yourself from dealing with a possible ADFS Certificate related alert in the M365 admin centre, you should change the "CertificateGenerationThreshold" is set to more than 30, for example, 35. 

Set-AdfsProperties -CertificateGenerationThreshold 35


2. ADFS Federation Metadata

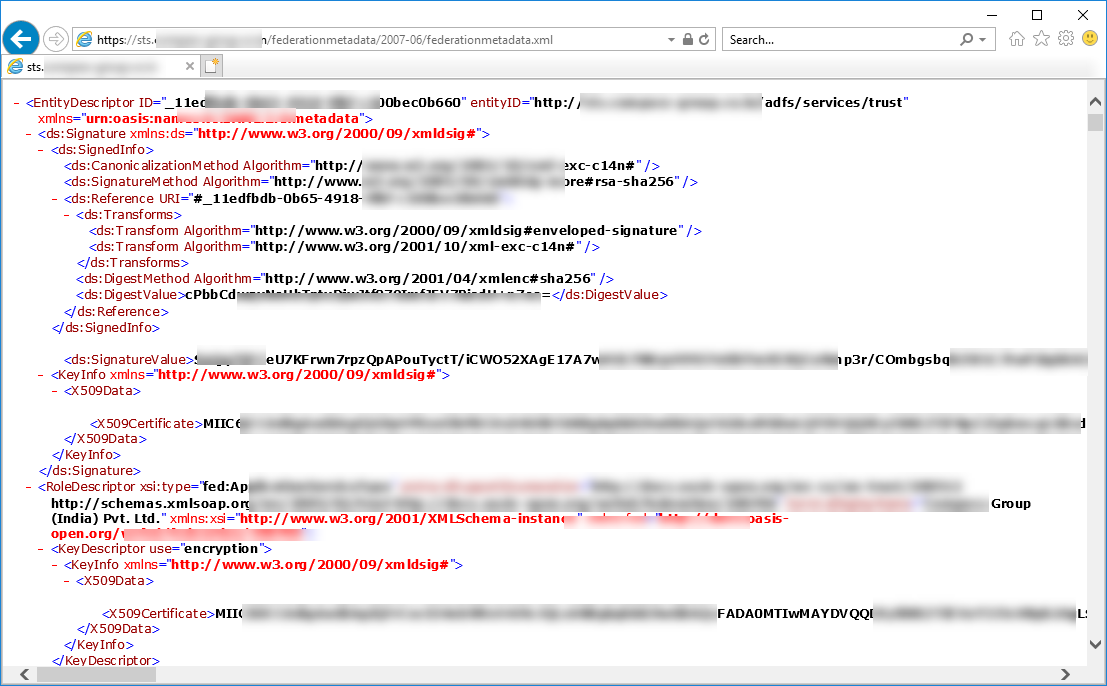
The AD FS federation metadata should be accessible publicly. This helps Microsoft alert (or not raise a false alarm) about token signing or decrypting certificates due for expiry. Check that your federation metadata is publicly accessible by navigating to the following URL from a computer on the public internet (off of the corporate network):
https://(your_FS_name)/federationmetadata/2007-06/federationmetadata.xml where (your_FS_name) is replaced with the federation service hostname your organization uses. 


If the metadata is publicly accessible, from home office or 3G/4G hotspots, the page will look like below.  If the page does not load, check for network connections being blocked on your firewall.


Read More

Unfederating a domain in Office 365 | Domain un-federation

No comments:
Usually, un-federating a domain is straight forward. You run the Convert-MSolDomainToStandard cmdlet from PowerShell Console on the ADFS Server. However, there may be situations when you can't access into the ADFS server, and you get a similar error -

Connect-MsolDomaintoStandard : Failed to connect to Active Directory Federation Services 2.0 on the local machine. Please try running set-msolADFSContext before running this command again. 


Convert-MsolDomainToStandard -DomainName vermasandeep.in -PasswordFile C:\Temp_Password_File.CSV -SkipUserConversion $False 


What to do now? How to un-federate the domain without fixing the ADFS issue first?

If you know ADFS Server is completely down or inaccessible for any reason, you can still convert the domain to 'standard' use below steps -

You can use the following cmdlet to convert the domain to 'managed'. This can come handy when you want to remove a domain from Microsoft 365 (formerly Office 365) tenant as soon as possible.

Set-MsolDomainAuthentication -DomainName <Domain Name>  –Authentication Managed


Step 1: Connect to Microsoft 365 / MSOL Service using PowerShell

connect-msolservice


Step 2: Verify the domain's current authentication method

get-msoldomain -DomainName vermasandeep.in


Step 3: Convert the Domain's method to 'Managed'

Set-MsolDomainAuthentication -DomainName vermasandeep.in –Authentication Managed


Step 3: Verify the domain's new authentication method. Managed means standard.

get-msoldomain -DomainName vermasandeep.in


Simple!

Read More