Latest Posts

Showing posts with label Exchange Online. Show all posts

Outlook's Credential Prompts when access exchange online archives

No comments:
Have you ever encountered a frustrating issue while trying to access your in Outlook, where you are prompted to enter your credentials repeatedly? My team faced this issue recently across multiple Exchange online users, and it caused a lot of disruptions to work. After researching the problem, this issue occurs due to a specific Autodiscover call for the Archive Mailbox, which is going to the 'Root Domain.'

A third-party server answers the 'Root Domain' call, and it should not be returning a 401 for Autodiscover calls. This caused Outlook to believe that it needed to authenticate, and as a result, it ended up prompting me after the cached credentials failed.

We analyzed the problem by collecting data from my Outlook Advanced Logs and Fiddler Traces. This showed that the Root Domain call was causing the issue and that it was an expected Outlook behavior.

Next, I deployed the 'ExcludeHttpsRootDomain' Registry Key on a machine. This prevented the Basic Auth looking prompt and allowed Outlook to avoid the Root Domain call altogether. After relaunching Outlook, the issue was resolved, and the Autodiscover calls for the Primary and Archive mailboxes were successful.
Microsoft later recognized the issue being caused for multiple customers and suggested the fix we deployed was correct. In conclusion, if you are facing a similar issue with Outlook credential prompts for archive mailboxes, you can follow this multi-step process to resolve it. Start by analyzing the problem and collecting data from your Outlook Advanced Logs and Fiddler Traces.
Issue Some users are having issues with Credential Prompts for Archive Mailboxes in Outlook Analysis - We collected data from an affected user including Outlook Advanced Logs and Fiddler Traces - This showed us the prompting is coming from specific Autodiscover calls for the Archive Mailbox which is going to the ‘Root Domain’: POST https://<Domain here>/autodiscover/autodiscover.xml 401 Authorization Required (text/html) - The Root Domain call is answered by a 3rd party server and should not be returning a 401 for Autodiscover calls: Server: IdeaWebServer/5.1.0 - Since the server is retuning a 401 instead of a 500 or other hard failure, Outlook believes it needs to authenticate and ends up prompting after the cached credentials all fail - This ‘Root Domain’ call is By Design Outlook behavior - This Authentication Failure state is due to the Basic Authentication prompt which prevents proper Authentication using Modern Authentication for all subsequent connections, not just the Autodiscover call - Outlook shows a ‘Need Password’ indicator at the bottom of the screen and clicking this allows Modern Authentication to proceed again - That resolves the disconnected state, and the Primary and Archive connections succeed as expected - We deployed the ‘ExcludeHttpsRootDomain’ Registry Key on the affected client machine, relaunched Outlook and the issue was resolved: https://learn.microsoft.com/en-us/outlook/troubleshoot/profiles-and-accounts/unexpected-autodiscover-behavior - This prevented the Basic Auth prompting and allowed Outlook to avoid the Root Domain call altogether as it is not expected to succeed on this environment - A Fiddler trace after the change showed us the Autodiscover calls for the Primary and Archive mailboxes were then successful and no issue with the connectivity
Read More

Add members to Teams without Welcome Messages

No comments:


When you add someone to Teams, the recipients get a welcome message by Microsoft. In some situations, you might to suppress this default behavior by changing the setting at the Teams level.  

To DISABLE the welcome message, just use this parameter on the individual Teams or Unified Group " UnifiedGroupWelcomeMessageEnable"

You'd need to be connected to Exchange Online module via PowerShell for it to work.

Set-UnifiedGroup -Identity "Name of your Team or Group" -UnifiedGroupWelcomeMessageEnable:$false

Example - 

Set-UnifiedGroup -Identity "TEST Team1" -UnifiedGroupWelcomeMessageEnable:$false


If you want to restore the welcome email functionality, just set it to $True again.

Example: 

Set-UnifiedGroup -Identity "TEST Team1" -UnifiedGroupWelcomeMessageEnable:$true


Read More

Connect-MsolService : Exception of type 'Microsoft.Online.Administration.Automation.MicrosoftOnlineException' was thrown | 0x800488EE

No comments:
You are trying to use Windows PowerShell to connect to the Microsoft Online Services like Microsoft 365, Azure, or Microsoft Intune. You've downloaded and installed the required Module using the relevant Install-Module cmdlet, and are just ready to connect to the service via PowerShell. 

But you find yourself with this unfamiliar, weird  looking Error! 😣

Connect-MsolService : Exception of type
'Microsoft.Online.Administration.Automation.MicrosoftOnlineException' was thrown.

At line:1 char:1
+ Connect-MsolService
+ ~~~~~~~~~~~~~~~~~~~
+ CategoryInfo : OperationStopped: (:) [Connect-MsolService], Mic
rosoftOnlineException
+ FullyQualifiedErrorId : 0x800488EE,Microsoft.Online.Administration.Automation.ConnectMsolService


You try to resolve the error by usual troubleshooting practices like below yet the server does not connect correctly. 😠

  • Reboot the server
  • Upgrade to the latest version for PowerShell
  • Re-install PowerShell module
  • Check a machine supports TLS 1.2

What else to to? I troubleshooted this myself successfully spending 45+ minutes myself quite recently when helping someone configure MFA for VPN Clients using NPS Server Extension. I found out this error 0x800488EE is indeed connected to the Sign-in-Assistant service. Yes, its been more than a decade since Microsoft launched this tiny little tool which used to be a 'must have' even for client machines to connect using Outlook and Lync (yes, this old). 

You need to Uninstall and Re-install Microsoft Online Services Sign-In Assistant for IT Professionals RTW from below links. It comes in two variants, if the regular one does not work, you can install the beta version 

Now, the connection works fine!  😊

If the PowerShell still does not connect, try to Restart the Online Services Sign-In Assistant service. To do this, follow these steps:

  • Open Control Panel, click Administrative Tools, and then click Services.
  • In the list of services, right-click Microsoft Online Services Sign-In Assistant, and then click Restart.


Read More

Federate a domain in Office 365 | Setting up Single Sign On

No comments:

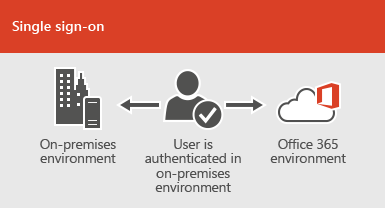
Image result for single sign on office 365

When you setup ADFS for your domain, you can use Single-Sign-On (SSO) for user authentication. It lets your users access corporate applications/resources like Office 365 with his/her network credentials. If they are using domain-joined computer, they sign-in automatically without having to provide user credentials at all. This magic happens after you federate the domain with Azure AD or Office 365. To do so, follow the below steps.
Prerequisites - You'd need Azure AD Module for PowerShell installed on your primary ADFS server. You will need to provide Global Admin account's username and password when prompted for credential.
Go to your Primary ADFS Server and connect to your Azure AD Tenant.
  1. On the Primary ADFS server, open an Administrator PowerShell window and import the MSOnline module
Import-Module MSOnline
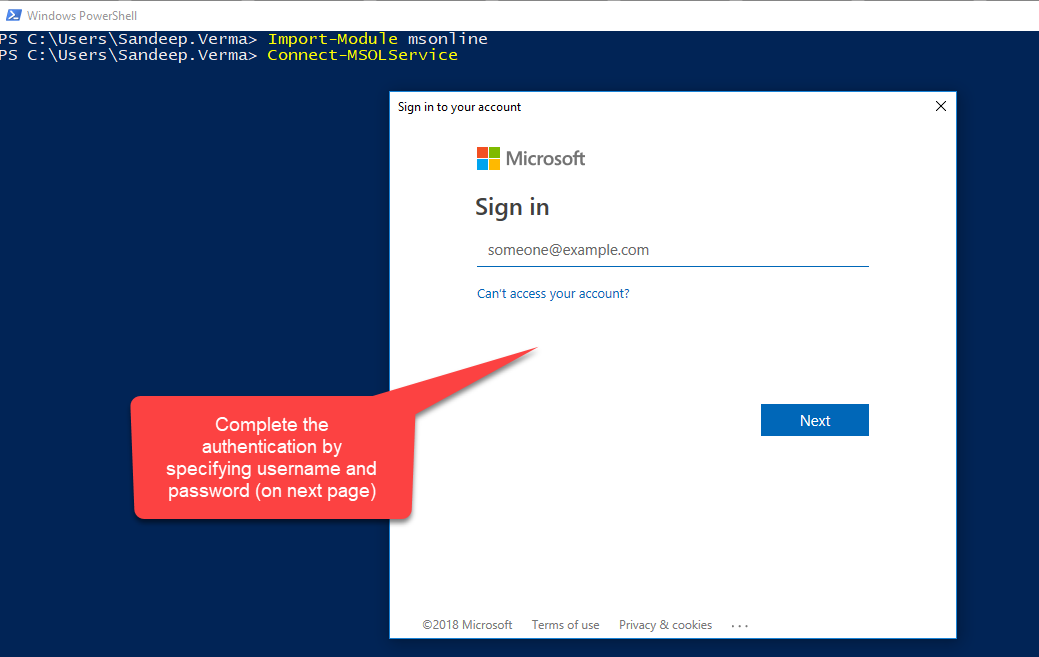
  1. Connect to your Azure AD Tenant
Connect-MSOLService
Sign in with a Global Admin account in the credential pop-up

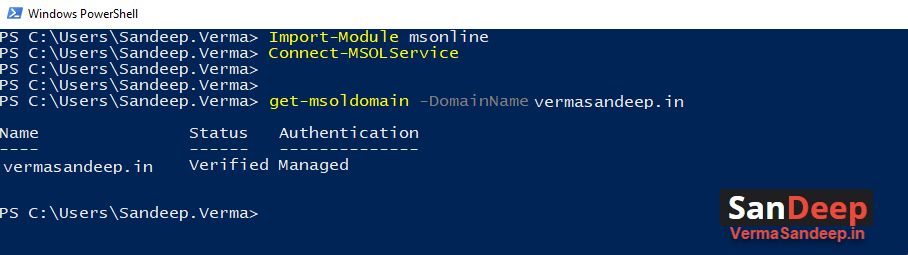
  1. Once you are connected to your Azure AD Tenant, let’s make sure your domain is currently recognized as a “Managed” domain.
Get-MsolDomain -Domainname

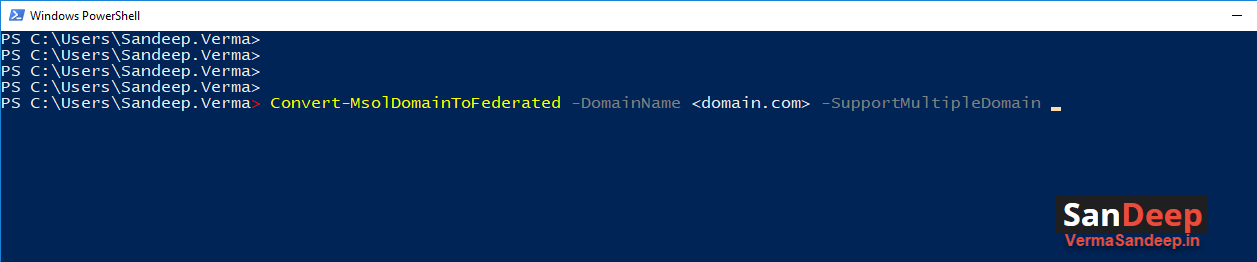
      4. Run the command to convert your domain.
Convert-MsolDomainToFederated -DomainName <domain.com> -SupportMultipleDomain

     5. Run the following PowerShell cmdlet to confirm the domain is converted:

If you see the Authentication is set to Federated, you should start observing Single-Sign-On in a few minutes. When you sign in to Office 365, it’ll start redirecting you to your ADFS sign-on page.

Read More

Letting group owners manage synchronized DLs in single tenant multi exchange hybrid office 365 scenarios

No comments:
In single tenant multi-exchange hybrid environments, Office 365 design can make the synchronized groups non-editable by the groups 'owners' via Outlook, especially if you are not writing back attributes to local ADs. In such environments, after migrating a user to Exchange Online, group membership administration job fall on the IT Teams' (Wintel/AD/Exchange/O365 etc.) shoulders. It is not only inconvenient for the group owner who struggling to manage his 'own' groups, it becomes a BIG headache for the IT teams. It is one of those which have a potential to increase the IT helpdesk tickets quite significantly. Losing control over their groups frustrates the group managers, which now have to depend on someone else to manage their groups after migrating to the cloud. They may even associate it with overall office 365 migration experience, not for the good reason. The problem exists only for the synchronized DLs. The fix is out of your hands, the problem is mostly rectifiable.

What can you do in such situations? You want to delegate the group management to their owners but definitely don't want to give them any admin rights into Exchange. Below have couple suggestions, none of them are ideal. Each has its own merits and demerits:

1. Convert all groups to cloud-based groups. [Not Recommended]
2. Dedicate a resource to do in on the owner's behalf. [Better then cloud-based option]
3. Have group owners edit the memberships directly in the AD. - DSQuery
%systemroot%\system32\rundll32.exe dsquery.dll,OpenQueryWindow [Better than other two options, Recommended]

Cloud-based groups

Cloud accounts do not have this problem. Converting some groups to 'cloud only' complicates the environment because you can no longer keep AD as the source of group creation and management (remember, we are talking no write-back scenario). If you use some groups for more than just Exchange, e.g. for delegating special permissions in the local domain, you'll have a tough time keeping the two copies consistent (one on-prem and other in the cloud) now that cloud ones need to be updated manually or via a script.

Dedicate a resource

Dedicate a team of resources to manage groups on the owner's behalf. It is not ideal but still better than managing cloud-based groups. It needs user education and awareness and they have to rely on the resource team for making changes. Some organizations will add this additional work of managing groups on the existing teams.

Using DSQuery

DSquery is a built-in command line tool for Active Directory. It was introduced with Windows Server 2003 but is still available in modern Windows computers & servers. If you want to find a user quickly in a local AD domain from the command prompt, you can use this utility on any domain-joined PC even as a normal user. Of course, you can't change anything unless you have got some permissions assigned to your account. But hey, the group managers do have permissions over their groups, right? hell yes!

Using this utility, you can have the group owners edit the memberships directly in the AD, which will sync up to Azure AD / O365 on the next AAD connect synchronization cycle.

The utility is fairly easy to use even by a non-IT person. Just enter the string I mention below in the "RUN" cmd (Windows + R) or Command Prompt. Admins can save a .bat file for the group managers on their Desktop to help them access this easily. 

How to access it? Just open Run Command window, Enter the string below and press Enter
%systemroot%\system32\rundll32.exe dsquery.dll,OpenQueryWindow


Viola!

Caveat: The DSQuery utility will work only when the manager is in the corporate domain, or when connected to it via VPN/Direct Access.


I understand all the options are only workarounds only some of you may already be aware of them. 
Read More

Avoid email delivery delays. Update your Office 365 MX Records| 451 4.4.62 Mail sent to the wrong Office 365 region. ATTR35

No comments:

Image result for mx records Exchange online

Microsoft is putting constraints on the MX record and smart host requirements Office 365. It only supports an MX record in the format "YourSmtpDomain-com.mail.protection.outlook.com." (notice mail.protection.Outlook.com!). It does NOT support any other, legacy entries for example, mail.messaging.microsoft.com. (notice Microsoft.com)

Office 365 assigns an MX DNS record to each domain. This MX record is unique and helps you route mail to the region and datacentre in which the tenant is located. Older DNS formats such as mail.eo.outlook.com, mail.messaging.microsoft.com, and mail.global.frontbridge.com are no longer supported. If you are pointing your MX records to these deprecated DNS entries, you need to make changes to your public DNS (MX Records). Failure in doing so by 25th May, 2018 will result in and deferred delivery of email.

If mail your email is deferred for this reason, you receive the following error message:  451 4.4.62 Mail sent to the wrong Office 365 region. ATTR35.

Check if you are affected

A ) If you have configured your mail routing directly through EOP \ Office 365, i.e. you use the DNS records that point to Office 365 in your MX record:
  • For each of your SMTP domains, including sub-domains, check your published MX record to verify that it matches the record that Office 365 assigned only (like *. mail.protection.outlook.com ). The ‘*’ looks similar to your smtp domain. You can use NSLOOKUP, Resolve-DNSName, or third-party tools such as Mxtoolbox.com. 
  • We recommend that you have only a single MX record pointing to EOP. In some cases. However, Office 365 already has extreme redundancy at every level, and multiple MX records can actually make mail delivery less reliable in this case.  

B) If you use Exchange in your on-premises environment, verify that the smart host value in the Send connector that routes mail to Office 365 does NOT use mail.messaging.microsoft.com, mail.global.frontbridge.com, or an Office 365 IP address.

C) If you use another provider for spam filtering or you have configured any mail routing through use of a "smart host" that is sending mail to Office 365 directly and not through your MX record, check the following:
  • You should check any services that route mail directly to your Office 365 tenant. For example, if you use a third-party filtering service, you should sign in to that service and verify the routing destination that is provided to the service, which is known as a "smart host." 
  • You should also check any email-generating applications, servers, or devices that are under your control that route mail directly to Office 365 or that "SMTP-relay" through Office 365 as unauthenticated mail. For more information, see attached document.
  • For each smart-host configuration or send connector or application SMTP server setting, you must use only the host record that Office 365 assigned to your tenant. i.e. MX record for your domain. E.g. YourSmtpDomain-com.mail.protection.outlook.com.

If your MX record(s) and smart host settings don’t contain incorrect values, then there is no action you need to take.

Read More

Minimal Machine Requirements for Office 365. Make Outlook 2007 and 2010 work with Office 365.

No comments:

Even though Office 365 has come a really long way from its beginning, I continue to meet customers who want to keep using their old versions of Office suites or Windows OS Machines. I continue to educate them how Office 365 is about new features built in-the-cloud and boosts the
Read More

Office 365 Import Service - now upload PST Files directly to Office 365 Mailboxes

No comments:

Office 365 Import Service

What is Office 365 Import Service

To help migration of PST files for users with very large PST Archives, MS just released (currently in Preview) the Office 365 Import Service. Office 365 Import service is the brand new service from Microsoft can use to transfer PST files from your on-premises environment to your Exchange Online mailboxes. You can even ship your files directly to Microsoft Datacenters and MS will upload it to your mailboxes (Isn’t it great?). You have two choices to move your data into Office 365
  • You can ship drives to Microsoft.
  • You can upload files to Office 365.
What you’ll need?
You need to prepare a PST to user mapping file and PST files, and hard drives (if you are shipping to Microsoft). And, permissions and admin roles required for using Microsoft Import Service.
You need to have Mailbox Import Export Admin Role in Exchange online to be able to use this service.
Important:
Only 3.5 inch SATA II/III hard drives are supported. Maximum size for each drive supported is 4 TB.
Hard drive should be NTFS formatted and single volume (Microsoft will process only 1st volume discarding all subsequent drive volumes.
Hard drives must be encrypted using BitLocker with encryption keys protected with numerical passwords. The Office 365 drive preparation tool will help with the encryption.
Which Method of Import Service is good for you?
If you have to transfer a large amount of data, and uploading it over the network is prohibitively expensive or not feasible, you can use the “drive shipping” service. In other cases, such as uploading smaller amounts of data, uploading PST files that were missed when you shipped the drive, and so on, you can upload the PST files over the network. Both methods result in the data getting moved into the Office 365 mailbox.
You can determine if your data is small or large based on your network upload performance numbers (bandwidth, latency). Typically, if you have more than 10 TB of data, drive shipping is faster.
Learn the quickie… So exactly how to use these services?
Detailed illustrations here are given for each of the methods below. Follow the relevant links
  1. Upload to Office 365
  2. Ship to Office 365
Go ahead and get started!

Read More

Assigning Mailbox Import Export Admin Role

No comments:

Before you can make use of Office 365 Import Service for your organization, you must be assigned mailbox import export admin role by your Global Administrator (you can assign yourself if you are the global admin). Here’s how to do it:

Under Exchange Admin Center, go to ‘Permissions’ and select ‘Admin Roles’
Select Add Roles (+ symbol) and add Mailbox Import Export from the list of roles.


Similarly, Add (+ sign) Members who should be assigned this role. You can select individual users as well as groups.


Press Save and it should start customizing your organization for you. Once done, you will get the following confirmation.

Done! Now you can go ahead and use the mailbox import-export service.

Read More

Change username and email address of users easily | Office 365 | PowerShell

No comments:
Okay now we see that there are quite a number of organizations are already using or migrating to Office 365 and password resets, changing usernames, email address and other log-in information for the users is one of the common day-to-day tasks that Office 365 Administrator has to deal with.

If your company is also moving tho the excellent cloud platform, lets learn how to change usernames and email addresses of the users in Exchange Online or Office 365. Today we will talk about the easy method of doing this stuff, also we are going to share a real quick and the Administrator's way of doing this task.

Easy way is to use Office 365 Portal or Admin Center.

1) Login into the Admin and go to Active Users under 'Users and Groups' inside 'Office 365 Admin Center'
2) Select the user (check box in front of it) to 'Edit' under Primary Email Address

3) Click Add New


4) Change Email Address as desired. Do not forget the domain part. By Default, it should be showing your *.onmicrosoft.com domain. Change accordingly.

Important to notice there is a check box to make this email address as Primary. This means all outgoing emails will be showing this id in the 'from' field to the recipients.


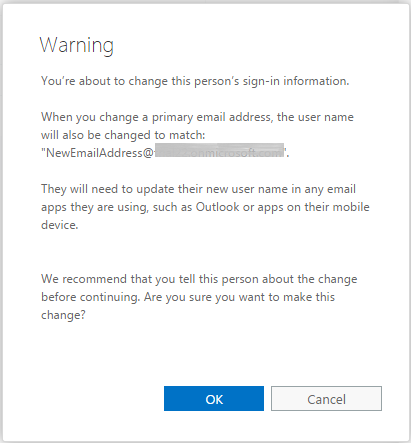
5) This warning message means that your user will be using this email id to login now onward.


6) Now click Save.


Done! Changes should reflect immediately!

And, now, if you also think it is not practical to follow these all these steps every time you need to make these changes, you can use the following great PowerShell command:

Set-MsolUserPrincipalName -userprincipalname  -NewUserPrincipalName


You can run this powershell command set from your own computer. To run this powershell, the computer must have:
Read More

Export a list of mobile devices active in your Exchange Online Organization | Office 365

No comments:
Exchange ActiveSync

Yeah, I know its much awaited feature in Office 365, and more or less, there is very little information available on the internet about this at this time. To be true, there is now a method of exporting list of devices that run exchange ActiveSync on mobile devices. Here is goes:


$MailBox = Get-Mailbox -ResultSize Unlimited
$MailBox | %{$PrimarySmtpAddress=$_.PrimarySmtpAddress; Get-ActiveSyncDeviceStatistics -Mailbox $_.Identity | Select-Object @{Name="PrimarySmtpAddress";Expression={$PrimarySmtpAddress}}, DeviceType, DeviceOS, DeviceMobileOperator, LastSyncAttemptTime} | Export-CSV "D:\ActiveSyncDevices.csv" -Encoding utf8 -NoTypeInformation -Delimiter ";"

The above commands will export all information about your mobile devices configured with last sync time by your users like mobile device, device type, device family and even mobile operator.

Enjoy!!

Read More