Microsoft® Office 365 for small businesses is an easy-to-use set of web-enabled tools that let you access your email, important documents, contacts, and calendar from almost anywhere and any device—including PCs, Macintosh computers, iPhones, Android phones, and BlackBerry smartphones. Designed to meet the needs of a diverse range of small businesses, Office 365 lets you choose which tools to use. It works seamlessly with the programs you already know and use
Showing posts sorted by relevance for query Microsoft 365. Sort by date Show all posts
Showing posts sorted by relevance for query Microsoft 365. Sort by date Show all posts
Minimal Machine Requirements for Office 365. Make Outlook 2007 and 2010 work with Office 365.

Even though Office 365 has come a really long way from its beginning, I continue to meet customers who want to keep using their old versions of Office suites or Windows OS Machines. I continue to educate them how Office 365 is about new features built in-the-cloud and boosts the
Avoid email delivery delays. Update your Office 365 MX Records| 451 4.4.62 Mail sent to the wrong Office 365 region. ATTR35

Microsoft is putting constraints on the MX record and smart host requirements Office 365. It only supports an MX record in the format "YourSmtpDomain-com.mail.protection.outlook.com." (notice mail.protection.Outlook.com!). It does NOT support any other, legacy entries for example, mail.messaging.microsoft.com. (notice Microsoft.com)
Office 365 assigns an MX DNS record to each domain.
This MX record is unique and helps you route mail to the region and
datacentre in which the tenant is located. Older DNS formats such
as mail.eo.outlook.com, mail.messaging.microsoft.com, and
mail.global.frontbridge.com are no longer supported. If you are pointing
your MX records to these deprecated DNS entries, you need to make changes to
your public DNS (MX Records). Failure in doing so by 25th May,
2018 will result in and deferred delivery of email.
If mail your email is deferred for this reason, you receive
the following error message: 451 4.4.62 Mail sent to the wrong Office 365 region. ATTR35.
Check if you are affected
A ) If you have configured your mail routing directly
through EOP \ Office 365, i.e. you use the DNS records that
point to Office 365 in your MX record:
- For
each of your SMTP domains, including sub-domains, check your published MX
record to verify that it matches the record that Office
365 assigned only (like *. mail.protection.outlook.com
). The ‘*’ looks similar to your smtp domain. You can use NSLOOKUP, Resolve-DNSName, or third-party tools such as
Mxtoolbox.com.
- We
recommend that you have only a single MX record pointing to EOP. In some
cases. However, Office 365 already has extreme redundancy at every level,
and multiple MX records can actually make mail delivery less reliable in
this case.
B) If you use Exchange in your on-premises environment,
verify that the smart host value in the Send connector that routes mail
to Office 365 does NOT use mail.messaging.microsoft.com,
mail.global.frontbridge.com, or an Office 365 IP address.
C) If you use another provider for spam filtering or
you have configured any mail routing through use of a "smart host"
that is sending mail to Office 365 directly and not through your MX
record, check the following:
- You
should check any services that route mail directly to
your Office 365 tenant. For example, if you use a third-party filtering
service, you should sign in to that service and verify the routing
destination that is provided to the service, which is known as a
"smart host."
- You
should also check any email-generating applications, servers,
or devices that are under your control that route mail
directly to Office 365 or that "SMTP-relay" through
Office 365 as unauthenticated mail. For more information, see attached
document.
- For
each smart-host configuration or send connector or
application SMTP server setting, you must use only the host record that Office
365 assigned to your tenant. i.e. MX record for your domain. E.g. YourSmtpDomain-com.mail.protection.outlook.com.
If your MX record(s) and smart host settings don’t contain
incorrect values, then there is no action you need to take.
Office 365 Import Service - now upload PST Files directly to Office 365 Mailboxes
Office 365 Import Service
What is Office 365 Import Service
To help migration of PST files for users with very large PST Archives, MS just released (currently in Preview) the Office 365 Import Service. Office 365 Import service is the brand new service from Microsoft can use to transfer PST files from your on-premises environment to your Exchange Online mailboxes. You can even ship your files directly to Microsoft Datacenters and MS will upload it to your mailboxes (Isn’t it great?). You have two choices to move your data into Office 365
-
You can ship drives to Microsoft.
-
You can upload files to Office 365.
 What you’ll need?
You need to prepare a PST to user mapping file and PST files, and hard drives (if you are shipping to Microsoft). And, permissions and admin roles required for using Microsoft Import Service.
You need to have Mailbox Import Export Admin Role in Exchange online to be able to use this service.
Important:
Only 3.5 inch SATA II/III hard drives are supported. Maximum size for each drive supported is 4 TB.
Hard drive should be NTFS formatted and single volume (Microsoft will process only 1st volume discarding all subsequent drive volumes.
Hard drives must be encrypted using BitLocker with encryption keys protected with numerical passwords. The Office 365 drive preparation tool will help with the encryption.
Which Method of Import Service is good for you?
If you have to transfer a large amount of data, and uploading it over the network is prohibitively expensive or not feasible, you can use the “drive shipping” service. In other cases, such as uploading smaller amounts of data, uploading PST files that were missed when you shipped the drive, and so on, you can upload the PST files over the network. Both methods result in the data getting moved into the Office 365 mailbox.
You can determine if your data is small or large based on your network upload performance numbers (bandwidth, latency). Typically, if you have more than 10 TB of data, drive shipping is faster.
Learn the quickie… So exactly how to use these services?
Detailed illustrations here are given for each of the methods below. Follow the relevant links
-
Upload to Office 365
-
Ship to Office 365
Go ahead and get started!
To help migration of PST files for users with very large PST Archives, MS just released (currently in Preview) the Office 365 Import Service. Office 365 Import service is the brand new service from Microsoft can use to transfer PST files from your on-premises environment to your Exchange Online mailboxes. You can even ship your files directly to Microsoft Datacenters and MS will upload it to your mailboxes (Isn’t it great?). You have two choices to move your data into Office 365
- You can ship drives to Microsoft.
- You can upload files to Office 365.
What you’ll need?
You need to prepare a PST to user mapping file and PST files, and hard drives (if you are shipping to Microsoft). And, permissions and admin roles required for using Microsoft Import Service.
You need to have Mailbox Import Export Admin Role in Exchange online to be able to use this service.
Important:
Only 3.5 inch SATA II/III hard drives are supported. Maximum size for each drive supported is 4 TB.
Hard drive should be NTFS formatted and single volume (Microsoft will process only 1st volume discarding all subsequent drive volumes.
Hard drives must be encrypted using BitLocker with encryption keys protected with numerical passwords. The Office 365 drive preparation tool will help with the encryption.
Which Method of Import Service is good for you?
If you have to transfer a large amount of data, and uploading it over the network is prohibitively expensive or not feasible, you can use the “drive shipping” service. In other cases, such as uploading smaller amounts of data, uploading PST files that were missed when you shipped the drive, and so on, you can upload the PST files over the network. Both methods result in the data getting moved into the Office 365 mailbox.
You can determine if your data is small or large based on your network upload performance numbers (bandwidth, latency). Typically, if you have more than 10 TB of data, drive shipping is faster.
Learn the quickie… So exactly how to use these services?
Detailed illustrations here are given for each of the methods below. Follow the relevant links
- Upload to Office 365
- Ship to Office 365
Go ahead and get started!
SMTP Relay options in Office 365
This could be a necessary to use in many cases, for example, you have a multi-functional printer, scanner, LOB Application like SAP, ERP, HR Management System or literally any line of business application which needs to send email notifications out to your recipients - inside or outside of your domains.
There are three main methods of sending an email, and 4th one which includes setting up IIS server which can be configured to use any of the three options. Here is what they are and what are the limits for each of the method.
- Client Submission method
- Direct Send
- Office 365 SMTP Relay
- Indirect Client Submission Method (IIS based Relay)
Method
|
What it means
|
Prerequisite
|
Features
|
Limitation
|
Authenticate your device or application directly with an Office 365 mailbox.
The device or application uses an email account to send email to recipients just like an email client.
IMPORTANT: Use one service account for not more than 3
applications/devices in SMTP Client Submission Method.
|
|
Send email anywhere – inside or outside of the organization.
Bypass most spam checks for ‘your’ users.
Send from any location or IP.
Send from third-party cloud hosting service, like Microsoft Azure
|
| |
Send mail directly from your printer or application.
|
|
No user credential to be configured.
No TLS support required for device.
Senders are not bound by the 30 messages per minute or 10,000 recipients per day limit.
|
| |
Send email by relaying them through SMTP relay. Office 365 authenticates the emails you submit by originating IP address you configure when creating a connector for the purpose.
|
|
|
| |
When you need client submission but it not supported by device
|
|
|
Same as client submission method.
|
SMTP Client Submission Method (Recommended)
In this scenario, the device or application uses an email account to send email to recipients just like an email client. Configure your device or application to authenticate with an Office 365 mailbox, and use SMTP client submission.
IMPORTANT: Use one service account for not more than 3 applications/devices in SMTP Client Submission Method.
IMPORTANT: Use one service account for not more than 3 applications/devices in SMTP Client Submission Method.
If your device or application can authenticate and send email using an Office 365 mailbox account, this is the recommended method.

Each device or application can have its own sender address, or all devices can use one address, such as printer@contoso.com. If you want to send email from a third-party hosted application or service, you must use SMTP client submission. In this scenario, the device or application connects directly to Office 365 using the SMTP client submission endpoint smtp.office365.com.
Prerequisites of Client Submission method
- Sender must have a licensed mailbox in O365.
- SMTP and TLS capabilities for the application.
- Port 587 (or 25 on alternate configuration) unlocked on network.
Limits for Client Submission method
- Device or application server must support TLS
- 30 messages sent per minute throttle.
- 10,000 recipients per day limit
How to configure SMTP client submission
Devices and applications vary in functionality and terminology use. However, these configuration settings will help you set up SMTP client submission.
- Authentication: You must be able to configure a user name and password to send email on the device.
- Mailbox: You must have a licensed Office 365 mailbox to send email from.
- Transport Layer Security (TLS): Your device must be able to use TLS version 1.0 and above.
- Port: Port 587 (recommended) or port 25 is required and must be unblocked on your network.
Enter the settings directly on the device or in the application as the device guide or manual instructs.
Device or Application setting
|
Value
|
Server/smart host
|
smtp.office365.com
|
Port
|
Port 587 (recommended) or port 25
|
TLS/ StartTLS
|
Enabled
|
Username/email address and password
|
Login credentials of hosted mailbox being used
|
Direct Send
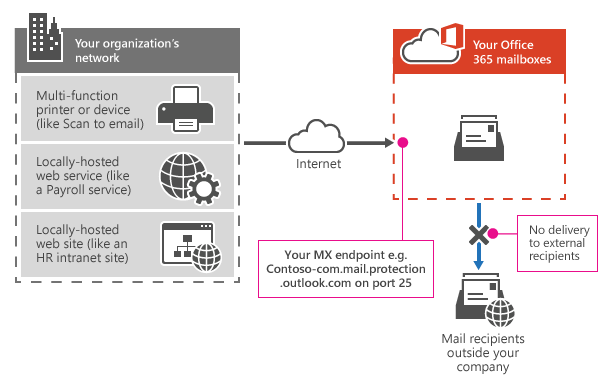
If the device or application is only sending email to your own Office 365 users and SMTP client submission is not an option, this is the simplest method. There is no Office 365 configuration needed. However, in this case, Office 365 does not relay messages for external recipients and will only deliver to your hosted mailboxes. If your device sends an email to Office 365 that is for a recipient outside your organization, the email will be rejected.
In the following diagram, the application or device in your organization’s network uses direct send and your Office 365 mail exchange (MX) endpoint to email recipients in your organization. It's easy to find your MX endpoint in Office 365 if you need to look it up.
Prerequisites for Direct Send
- Port: Port 25 is required and must be unblocked on your network.
- Static IP address is recommended: A static IP address is recommended so that an SPF record can be created for your domain. This helps avoid your messages being flagged as spam.
Limits of Direct Send
- Direct send cannot be used to deliver email to external recipients, for example, recipients with Yahoo or Gmail addresses.
- Your messages will be subject to antispam checks.
- Sent mail might be disrupted if your IP addresses are blocked by a spam list.
- Office 365 uses throttling policies to protect the performance of the service.
How to configure Direct Send
Simply, configure the device to send email to the MX record for one of your domains on port 25. The emails send to office 365 hosted mailboxes of your organization will be delivered. Any email send to an outsider will be rejected.
Office 365 SMTP Relay
Office 365 SMTP relay is very similar to direct send except that it can send mail to external recipients.
You configure a connector so your device or application can send email to Office 365. Office 365 can then relay email to your organization mailboxes and to external recipients.
In the following diagram, the application or device in your organization’s network uses a connector for SMTP relay to email recipients in your organization.
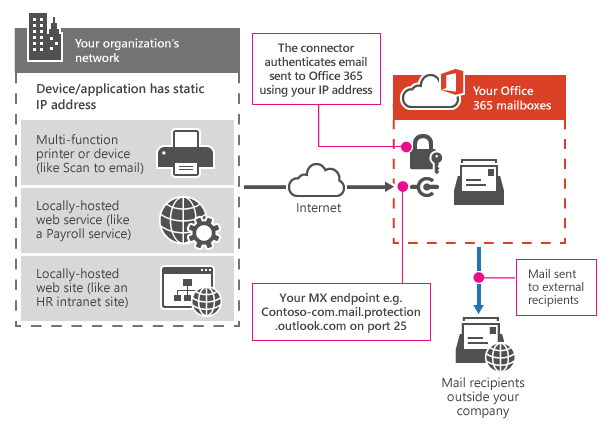
Important: The Office 365 connector that you configure authenticates your device or application with Office 365 using an IP address. Your device or application can send email using any address (including ones that can't receive mail), as long as the address uses one of your Office 365 domains. The email address doesn’t need to be associated with an actual mailbox. For example, if your domain is contoso.com, you could send from an address like do_not_reply@contoso.com.
Requirements for Office 365 SMTP relay
- Static IP address or address range: Most devices or applications are unable to use a certificate for authentication. To authenticate your device or application, use one or more static IP addresses that are not shared with another organization.
- Connector: You must set up a connector in Exchange Online for email sent from your device or application.
- Port: Port 25 is required and must not be blocked on your network or by your ISP.
- Licensing: SMTP relay doesn’t use a specific Office 365 mailbox to send email. This is why it’s important that only licensed users send email from devices or applications configured for SMTP relay. If you have senders using devices or LOB applications who don’t have an Office 365 mailbox license, obtain and assign an Exchange Online Protection license to each unlicensed sender. This is the least expensive license that allows you to send email via Office 365.
Limitations of Office 365 SMTP Relay
- Sent mail can be disrupted if your IP addresses are blocked by a spam list.
- Reasonable limits are imposed for sending. For more information, see Higher Risk Delivery Pool for Outbound Messages.
- Requires static unshared IP addresses (unless a certificate is used).
How to Configure SMTP Relay
This method allows Office 365 to relay emails on your behalf by authenticating using your public IP address (or a certificate). This requires a connector to be set up for your Office 365 account.
Device or application setting
|
Value
|
Server/smart host
|
Your MX endpoint, e.g. yourcontosodomain-com.mail.protection.outlook.com
|
Port
|
Port 25
|
TLS/StartTLS
|
Enabled
|
Email address
|
Any email address for one of your Office 365 verified domains. This email address does not need a mailbox.
|
We recommend adding an SPF record to avoid having messages flagged as spam. If you are sending from a static IP address, add it to your SPF record in your domain registrar’s DNS settings as follows:
DNS entry
|
Value
|
SPF
|
v=spf1 ip4:
|
Indirect Client Submission Method
If it is essential to use SMTP client submission and your printer only supports SSL 3.0, you can set up an alternative configuration called Indirect SMTP client submission. This uses a local SMTP relay server to connect to Office 365. This is a much more complex setup.
Instructions can be found here- How to configure Internet Information Server (IIS) for relay with Office 365.
More info about any or all of these relay options can be found here: https://technet.microsoft.com/en-us/library/dn554323(v=exchg.150).aspx#configconnector


