Latest Posts

Showing posts sorted by date for query Exchange Online. Sort by relevance Show all posts

Outlook's Credential Prompts when access exchange online archives

No comments:
Have you ever encountered a frustrating issue while trying to access your in Outlook, where you are prompted to enter your credentials repeatedly? My team faced this issue recently across multiple Exchange online users, and it caused a lot of disruptions to work. After researching the problem, this issue occurs due to a specific Autodiscover call for the Archive Mailbox, which is going to the 'Root Domain.'

A third-party server answers the 'Root Domain' call, and it should not be returning a 401 for Autodiscover calls. This caused Outlook to believe that it needed to authenticate, and as a result, it ended up prompting me after the cached credentials failed.

We analyzed the problem by collecting data from my Outlook Advanced Logs and Fiddler Traces. This showed that the Root Domain call was causing the issue and that it was an expected Outlook behavior.

Next, I deployed the 'ExcludeHttpsRootDomain' Registry Key on a machine. This prevented the Basic Auth looking prompt and allowed Outlook to avoid the Root Domain call altogether. After relaunching Outlook, the issue was resolved, and the Autodiscover calls for the Primary and Archive mailboxes were successful.
Microsoft later recognized the issue being caused for multiple customers and suggested the fix we deployed was correct. In conclusion, if you are facing a similar issue with Outlook credential prompts for archive mailboxes, you can follow this multi-step process to resolve it. Start by analyzing the problem and collecting data from your Outlook Advanced Logs and Fiddler Traces.
Issue Some users are having issues with Credential Prompts for Archive Mailboxes in Outlook Analysis - We collected data from an affected user including Outlook Advanced Logs and Fiddler Traces - This showed us the prompting is coming from specific Autodiscover calls for the Archive Mailbox which is going to the ‘Root Domain’: POST https://<Domain here>/autodiscover/autodiscover.xml 401 Authorization Required (text/html) - The Root Domain call is answered by a 3rd party server and should not be returning a 401 for Autodiscover calls: Server: IdeaWebServer/5.1.0 - Since the server is retuning a 401 instead of a 500 or other hard failure, Outlook believes it needs to authenticate and ends up prompting after the cached credentials all fail - This ‘Root Domain’ call is By Design Outlook behavior - This Authentication Failure state is due to the Basic Authentication prompt which prevents proper Authentication using Modern Authentication for all subsequent connections, not just the Autodiscover call - Outlook shows a ‘Need Password’ indicator at the bottom of the screen and clicking this allows Modern Authentication to proceed again - That resolves the disconnected state, and the Primary and Archive connections succeed as expected - We deployed the ‘ExcludeHttpsRootDomain’ Registry Key on the affected client machine, relaunched Outlook and the issue was resolved: https://learn.microsoft.com/en-us/outlook/troubleshoot/profiles-and-accounts/unexpected-autodiscover-behavior - This prevented the Basic Auth prompting and allowed Outlook to avoid the Root Domain call altogether as it is not expected to succeed on this environment - A Fiddler trace after the change showed us the Autodiscover calls for the Primary and Archive mailboxes were then successful and no issue with the connectivity
Read More

Add members to Teams without Welcome Messages

No comments:


When you add someone to Teams, the recipients get a welcome message by Microsoft. In some situations, you might to suppress this default behavior by changing the setting at the Teams level.  

To DISABLE the welcome message, just use this parameter on the individual Teams or Unified Group " UnifiedGroupWelcomeMessageEnable"

You'd need to be connected to Exchange Online module via PowerShell for it to work.

Set-UnifiedGroup -Identity "Name of your Team or Group" -UnifiedGroupWelcomeMessageEnable:$false

Example - 

Set-UnifiedGroup -Identity "TEST Team1" -UnifiedGroupWelcomeMessageEnable:$false


If you want to restore the welcome email functionality, just set it to $True again.

Example: 

Set-UnifiedGroup -Identity "TEST Team1" -UnifiedGroupWelcomeMessageEnable:$true


Read More

Retaining leaver's data in Microsoft 365 - Onedrive for business

No comments:


In most organisations, compliance with data retention policies is driven by statutory or legal requirements. By default, when a person disassociates from the company, email/One Drive for Business is retained for a month of deletion of the account. To avoid permanent deletion of the data after 30 day period, you can use Inactive mailbox or Shared mailbox features to forever keep the mailbox contents within the service (for FREE!), but OneDrive data needs to be handled manually (or automated by a separate process which is beyond the scope of this article). One Drive for Business data can be copied to SharePoint sites and kept for reference purpose.

Microsoft 365 Data retention policies can be customised to meet your specific business, legal requirements. Standard behaviour when a user is deleted from AD or unlicensed in O365 is you have 30 days to recover the mailbox and OneDrive content. SharePoint and Yammer data is not lost when the user leaves.

If you are synchronising your Active Directory (AD) with Azure AD by Azure AD Connect, you should consider populating the manager attribute in local AD. If you use accounts created directly in the Cloud, Manager can be set within the Office 365 Exchange Admin Center or Azure AD. With the manager attribute populated the users ‘manager’ is provided access to their OneDrive site contents automatically upon deletion of the account. They are notified by automatic emails as well  - one notification immediately upon deletion (i.e. 30 days before permanent deletion) and one a week before permanent deletion. They can decide if the content is worth keeping or not. If they need the contents, from within the OneDrive site, files and folders can be moved or copied to another SharePoint sites. Alternatively, they can 'sync' the location to a Windows machine using OneDrive sync client.

Version control is enabled by default for OneDrive and SharePoint. So, a user can go as far back as they want to assuming the version wasn’t deleted manually.
OneDrive keeps the deleted items in its recycle bin for a maximum 30 days. To restore deleted files from OneDrive in Windows 10, follow the instruction in below part.

STEP 1. Right-click OneDrive icon and select view online;
STEP 2. Sign in your OneDrive account on the OneDrive for business;
STEP 3. Click the Recycle Bin button on the left pane;

recover OneDrive deleted files from recycle bin within 30 days

STEP 4. All the deleted files and folders will be displayed on the right pane. To restore specific files or folders, pick them by selecting their checkbox; to restore all items, tap or click Restore all items.

NOTE: When you delete files on OneDrive using File Explorer, they're moved to your computer's desktop Recycle Bin. You can simply restore them from there unless you emptied Windows Recycle Bin or Recycle Bin is overflowing, by then old items would be removed automatically.

This page includes some details about OneDrive for Business site retention and deletion i.e. process followed when OneDrive site is deleted.

Note - 
Retention policies always take precedence to the standard OneDrive deletion process, so content included in a policy could be deleted before 30 days or retained for longer than the OneDrive retention. For more info, see Overview of retention policies. Likewise, if a OneDrive is put on hold as part of an eDiscovery case, managers and secondary owners will be sent email about the pending deletion, but the OneDrive won't be deleted until the hold is removed.

The retention period for cleanup of OneDrive begins when a user account is deleted from Azure Active Directory. No other action will cause the cleanup process to occur, including blocking the user from signing in or removing the user's license. For info about removing a user's license, see Remove licenses from users in Office 365 for business.
Read More

Compare office 365 plans - Office 365 E1 Vs E3

No comments:


You'd think Microsft already must have published the differences between all their subscriptions clearly, but at the time of writing this article, it hasn't. Period. At least there aren't many resources which clearly tell what's the difference!
So, as simple as it may sound, it's not that easy to find a reliable comparison of Office 365 E1 plan Vs Office 365 E3. A log of people want to save on licensing cost by replacing some E3 licenses with E1 but they do not know what features will they miss while doing that. So, I decided to write this article. Hopefully, you will find it helpful.

E3 gives you a bigger mailbox, unlimited archive, litigation hold, unlimited OneDrive etc. It has some other features too which are not available in E1 mentioned below. For E3 users using Office ProPlus today, you can apply S1 (i.e. E3 + ProPlus). This will put some limits on the mailbox, OneDrive etc. based on the E1 plan and remove access to E3-only features which are not available in E1.

Feature
E1
E3
Flow for Office 365
Yes
Yes
Microsoft Planner
Yes
Yes
Microsoft StaffHub
Yes
Yes
Microsoft Teams
Yes
Yes
Office Mobile Apps for Office 365
Yes
Yes
Office Online
Yes
Yes
PowerApps for Office 365
Yes
Yes
Skype for Business Online (Plan 2)
Yes
Yes
Stream for Office 365
Yes
Yes
Sway
Yes
Yes
Yammer Enterprise
Yes
Yes
Exchange Online
  Plan 1: 100 GB mailbox + Archive combined
  Plan 2: 100 GB mailbox + Unlimited Archive
Plan 1
Plan 2
Microsoft Forms
Plan 1
Plan 3
SharePoint Online
  Plan 1: 1TB OneDrive Storage
  Plan 2: Unlimited OneDrive Storage, DLP, In-place Hold
Plan 1
Plan 2
To-Do
Plan 1
Plan 2
Azure Rights Management
-
Yes
Office 365 ProPlus
-
Yes
Data Loss Prevention
-
Yes
Litigation Hold
-
Yes
eDiscovery, Content Search
-
Yes


So, that's it. Now go ahead, swap those licenses. If you need some automation on it, I will soon post a script. Keep checking this space. :)
Read More

Letting group owners manage synchronized DLs in single tenant multi exchange hybrid office 365 scenarios

No comments:
In single tenant multi-exchange hybrid environments, Office 365 design can make the synchronized groups non-editable by the groups 'owners' via Outlook, especially if you are not writing back attributes to local ADs. In such environments, after migrating a user to Exchange Online, group membership administration job fall on the IT Teams' (Wintel/AD/Exchange/O365 etc.) shoulders. It is not only inconvenient for the group owner who struggling to manage his 'own' groups, it becomes a BIG headache for the IT teams. It is one of those which have a potential to increase the IT helpdesk tickets quite significantly. Losing control over their groups frustrates the group managers, which now have to depend on someone else to manage their groups after migrating to the cloud. They may even associate it with overall office 365 migration experience, not for the good reason. The problem exists only for the synchronized DLs. The fix is out of your hands, the problem is mostly rectifiable.

What can you do in such situations? You want to delegate the group management to their owners but definitely don't want to give them any admin rights into Exchange. Below have couple suggestions, none of them are ideal. Each has its own merits and demerits:

1. Convert all groups to cloud-based groups. [Not Recommended]
2. Dedicate a resource to do in on the owner's behalf. [Better then cloud-based option]
3. Have group owners edit the memberships directly in the AD. - DSQuery
%systemroot%\system32\rundll32.exe dsquery.dll,OpenQueryWindow [Better than other two options, Recommended]

Cloud-based groups

Cloud accounts do not have this problem. Converting some groups to 'cloud only' complicates the environment because you can no longer keep AD as the source of group creation and management (remember, we are talking no write-back scenario). If you use some groups for more than just Exchange, e.g. for delegating special permissions in the local domain, you'll have a tough time keeping the two copies consistent (one on-prem and other in the cloud) now that cloud ones need to be updated manually or via a script.

Dedicate a resource

Dedicate a team of resources to manage groups on the owner's behalf. It is not ideal but still better than managing cloud-based groups. It needs user education and awareness and they have to rely on the resource team for making changes. Some organizations will add this additional work of managing groups on the existing teams.

Using DSQuery

DSquery is a built-in command line tool for Active Directory. It was introduced with Windows Server 2003 but is still available in modern Windows computers & servers. If you want to find a user quickly in a local AD domain from the command prompt, you can use this utility on any domain-joined PC even as a normal user. Of course, you can't change anything unless you have got some permissions assigned to your account. But hey, the group managers do have permissions over their groups, right? hell yes!

Using this utility, you can have the group owners edit the memberships directly in the AD, which will sync up to Azure AD / O365 on the next AAD connect synchronization cycle.

The utility is fairly easy to use even by a non-IT person. Just enter the string I mention below in the "RUN" cmd (Windows + R) or Command Prompt. Admins can save a .bat file for the group managers on their Desktop to help them access this easily. 

How to access it? Just open Run Command window, Enter the string below and press Enter
%systemroot%\system32\rundll32.exe dsquery.dll,OpenQueryWindow


Viola!

Caveat: The DSQuery utility will work only when the manager is in the corporate domain, or when connected to it via VPN/Direct Access.


I understand all the options are only workarounds only some of you may already be aware of them. 
Read More

Avoid email delivery delays. Update your Office 365 MX Records| 451 4.4.62 Mail sent to the wrong Office 365 region. ATTR35

No comments:

Image result for mx records Exchange online

Microsoft is putting constraints on the MX record and smart host requirements Office 365. It only supports an MX record in the format "YourSmtpDomain-com.mail.protection.outlook.com." (notice mail.protection.Outlook.com!). It does NOT support any other, legacy entries for example, mail.messaging.microsoft.com. (notice Microsoft.com)

Office 365 assigns an MX DNS record to each domain. This MX record is unique and helps you route mail to the region and datacentre in which the tenant is located. Older DNS formats such as mail.eo.outlook.com, mail.messaging.microsoft.com, and mail.global.frontbridge.com are no longer supported. If you are pointing your MX records to these deprecated DNS entries, you need to make changes to your public DNS (MX Records). Failure in doing so by 25th May, 2018 will result in and deferred delivery of email.

If mail your email is deferred for this reason, you receive the following error message:  451 4.4.62 Mail sent to the wrong Office 365 region. ATTR35.

Check if you are affected

A ) If you have configured your mail routing directly through EOP \ Office 365, i.e. you use the DNS records that point to Office 365 in your MX record:
  • For each of your SMTP domains, including sub-domains, check your published MX record to verify that it matches the record that Office 365 assigned only (like *. mail.protection.outlook.com ). The ‘*’ looks similar to your smtp domain. You can use NSLOOKUP, Resolve-DNSName, or third-party tools such as Mxtoolbox.com. 
  • We recommend that you have only a single MX record pointing to EOP. In some cases. However, Office 365 already has extreme redundancy at every level, and multiple MX records can actually make mail delivery less reliable in this case.  

B) If you use Exchange in your on-premises environment, verify that the smart host value in the Send connector that routes mail to Office 365 does NOT use mail.messaging.microsoft.com, mail.global.frontbridge.com, or an Office 365 IP address.

C) If you use another provider for spam filtering or you have configured any mail routing through use of a "smart host" that is sending mail to Office 365 directly and not through your MX record, check the following:
  • You should check any services that route mail directly to your Office 365 tenant. For example, if you use a third-party filtering service, you should sign in to that service and verify the routing destination that is provided to the service, which is known as a "smart host." 
  • You should also check any email-generating applications, servers, or devices that are under your control that route mail directly to Office 365 or that "SMTP-relay" through Office 365 as unauthenticated mail. For more information, see attached document.
  • For each smart-host configuration or send connector or application SMTP server setting, you must use only the host record that Office 365 assigned to your tenant. i.e. MX record for your domain. E.g. YourSmtpDomain-com.mail.protection.outlook.com.

If your MX record(s) and smart host settings don’t contain incorrect values, then there is no action you need to take.

Read More

SMTP Relay options in Office 365

No comments:

In Office 365, you can use SMTP submission, direct send, or SMTP relay to allow a multifunction device, printer, or application to send email using Office 365 and Exchange Online.
This could be a necessary to use in many cases, for example, you have a multi-functional printer, scanner, LOB Application like SAP, ERP, HR Management System or literally any line of business application which needs to send email notifications out to your recipients - inside or outside of your domains.
There are three main methods of sending an email, and 4th one which includes setting up IIS server which can be configured to use any of the three options. Here is what they are and what are the limits for each of the method.
  1. Client Submission method
  2. Direct Send
  3. Office 365 SMTP Relay
  4. Indirect Client Submission Method (IIS based Relay)
Method
What it means
Prerequisite
Features
Limitation
Authenticate your device or application directly with an Office 365 mailbox.

The device or application uses an email account to send email to recipients just like an email client. IMPORTANT: Use one service account for not more than 3 applications/devices in SMTP Client Submission Method.
  • Sender must have a licensed mailbox in O365.
  • SMTP and TLS capabilities for the application.
  • Port 587 (or 25 on alternate configuration) unlocked on network.


  • Send email anywhere – inside or outside of the organization.
  • Bypass most spam checks for ‘your’ users.
  • Send from any location or IP.
  • Send from third-party cloud hosting service, like Microsoft Azure
    • Device or application server must support TLS
    • 30 messages sent per minute throttle.
    • 10,000 recipients per day limit.
    Send mail directly from your printer or application.
    • Port 25 must be unlocked.
    • Static IP is recommended
    • SPF record should be configured for domain


  • No user credential to be configured.
  • No TLS support required for device.
  • Senders are not bound by the 30 messages per minute or 10,000 recipients per day limit.
    • No mail delivery to external recipients.
    Send email by relaying them through SMTP relay. Office 365 authenticates the emails you submit by originating IP address you configure when creating a connector for the purpose.
    • Port 25 must be unlocked.
    • Office 365 Connector
    • Static IP or IP range is necessary (when not using certificate).
    • SPF record should be configured for domain
    • No user credential to be configured.
    • Can be used to send email to anybody, in
    • Mail transfer will disturb if IP gets black-listed in spam list.
    • Reasonable Sending limits are imposed.
    When you need client submission but it not supported by device
    • Same as Client submission, AND
    • IIS Server to host SMTP relay service
    • Can be used in almost all scenarios


  • Same as client submission method.
  • SMTP Client Submission Method (Recommended)

    In this scenario, the device or application uses an email account to send email to recipients just like an email client. Configure your device or application to authenticate with an Office 365 mailbox, and use SMTP client submission.

    IMPORTANT: Use one service account for not more than 3 applications/devices in SMTP Client Submission Method.
    If your device or application can authenticate and send email using an Office 365 mailbox account, this is the recommended method.
    Shows how a multifunction printer connects to Office 365 using SMTP client submission. The connection endpoint is smtp.office365.com on port 587, and the printer uses Office 365 mailbox credentials to send email to internal and external recipients.
    Each device or application can have its own sender address, or all devices can use one address, such as printer@contoso.com. If you want to send email from a third-party hosted application or service, you must use SMTP client submission. In this scenario, the device or application connects directly to Office 365 using the SMTP client submission endpoint smtp.office365.com.

    Prerequisites of Client Submission method

    • Sender must have a licensed mailbox in O365.
    • SMTP and TLS capabilities for the application.
    • Port 587 (or 25 on alternate configuration) unlocked on network.

    Limits for Client Submission method

    • Device or application server must support TLS
    • 30 messages sent per minute throttle.
    • 10,000 recipients per day limit


    How to configure SMTP client submission

    Devices and applications vary in functionality and terminology use. However, these configuration settings will help you set up SMTP client submission.
    • Authentication: You must be able to configure a user name and password to send email on the device.
    • Mailbox: You must have a licensed Office 365 mailbox to send email from.
    • Transport Layer Security (TLS): Your device must be able to use TLS version 1.0 and above.
    • Port: Port 587 (recommended) or port 25 is required and must be unblocked on your network.

    Enter the settings directly on the device or in the application as the device guide or manual instructs.


    Device or Application setting
    Value
    Server/smart host
    smtp.office365.com
    Port
    Port 587 (recommended) or port 25
    TLS/ StartTLS
    Enabled
    Username/email address and password
    Login credentials of hosted mailbox being used


    Direct Send

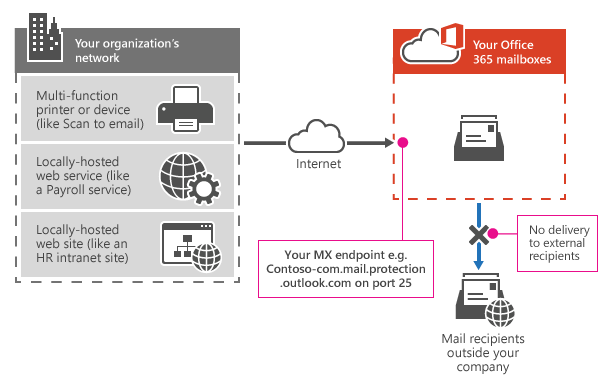
    If the device or application is only sending email to your own Office 365 users and SMTP client submission is not an option, this is the simplest method. There is no Office 365 configuration needed. However, in this case, Office 365 does not relay messages for external recipients and will only deliver to your hosted mailboxes. If your device sends an email to Office 365 that is for a recipient outside your organization, the email will be rejected.
    In the following diagram, the application or device in your organization’s network uses direct send and your Office 365 mail exchange (MX) endpoint to email recipients in your organization. It's easy to find your MX endpoint in Office 365 if you need to look it up.
    Shows how a multifunction printer uses your Office 365 MX endpoint to send email directly to recipients in your organization only.

    Prerequisites for Direct Send

    • Port: Port 25 is required and must be unblocked on your network.
    • Static IP address is recommended: A static IP address is recommended so that an SPF record can be created for your domain. This helps avoid your messages being flagged as spam.


    Limits of Direct Send

    • Direct send cannot be used to deliver email to external recipients, for example, recipients with Yahoo or Gmail addresses.
    • Your messages will be subject to antispam checks.
    • Sent mail might be disrupted if your IP addresses are blocked by a spam list.
    • Office 365 uses throttling policies to protect the performance of the service.


    How to configure Direct Send

    Simply, configure the device to send email to the MX record for one of your domains on port 25. The emails send to office 365 hosted mailboxes of your organization will be delivered. Any email send to an outsider will be rejected.


    Office 365 SMTP Relay

    Office 365 SMTP relay is very similar to direct send except that it can send mail to external recipients. 
    You configure a connector so your device or application can send email to Office 365. Office 365 can then relay email to your organization mailboxes and to external recipients.
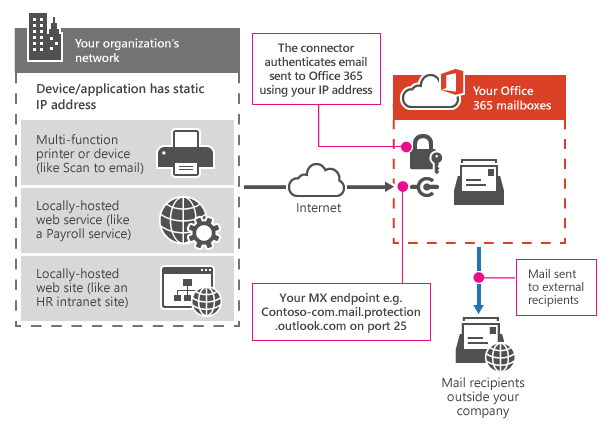
    In the following diagram, the application or device in your organization’s network uses a connector for SMTP relay to email recipients in your organization.
    Shows how a multifunction printer connects to Office 365 using SMTP relay. The printer uses your MX endpoint and requires a connector to authenticate using your IP address. The printer can send email to internal and external recipients.
    Important: The Office 365 connector that you configure authenticates your device or application with Office 365 using an IP address. Your device or application can send email using any address (including ones that can't receive mail), as long as the address uses one of your Office 365 domains. The email address doesn’t need to be associated with an actual mailbox. For example, if your domain is contoso.com, you could send from an address like do_not_reply@contoso.com.


    Requirements for Office 365 SMTP relay

    • Static IP address or address range: Most devices or applications are unable to use a certificate for authentication. To authenticate your device or application, use one or more static IP addresses that are not shared with another organization.
    • Connector: You must set up a connector in Exchange Online for email sent from your device or application.
    • Port: Port 25 is required and must not be blocked on your network or by your ISP.
    • Licensing: SMTP relay doesn’t use a specific Office 365 mailbox to send email. This is why it’s important that only licensed users send email from devices or applications configured for SMTP relay. If you have senders using devices or LOB applications who don’t have an Office 365 mailbox license, obtain and assign an Exchange Online Protection license to each unlicensed sender. This is the least expensive license that allows you to send email via Office 365.


    Limitations of Office 365 SMTP Relay

    • Sent mail can be disrupted if your IP addresses are blocked by a spam list.
    • Reasonable limits are imposed for sending. For more information, see Higher Risk Delivery Pool for Outbound Messages.
    • Requires static unshared IP addresses (unless a certificate is used).


    How to Configure SMTP Relay

    This method allows Office 365 to relay emails on your behalf by authenticating using your public IP address (or a certificate). This requires a connector to be set up for your Office 365 account. 
    Device or application setting
    Value
    Server/smart host
    Your MX endpoint, e.g. yourcontosodomain-com.mail.protection.outlook.com
    Port
    Port 25
    TLS/StartTLS
    Enabled
    Email address
    Any email address for one of your Office 365 verified domains. This email address does not need a mailbox.


    We recommend adding an SPF record to avoid having messages flagged as spam. If you are sending from a static IP address, add it to your SPF record in your domain registrar’s DNS settings as follows:
    DNS entry
    Value
    SPF
    v=spf1 ip4: include:spf.protection.outlook.com ~all


    Indirect Client Submission Method

    If it is essential to use SMTP client submission and your printer only supports SSL 3.0, you can set up an alternative configuration called Indirect SMTP client submission. This uses a local SMTP relay server to connect to Office 365. This is a much more complex setup.

    More info about any or all of these relay options can be found here:  https://technet.microsoft.com/en-us/library/dn554323(v=exchg.150).aspx#configconnector
    Read More